 |
|||
|
|
|||
|
Page Title:
Crankshaft Wear Sleeve (Rear) - Remove (If Equipped) |
|
||
| ||||||||||
|
|
 TM 9-2320-312-24-2
Truck Engine
Disassembly and Assembly Section
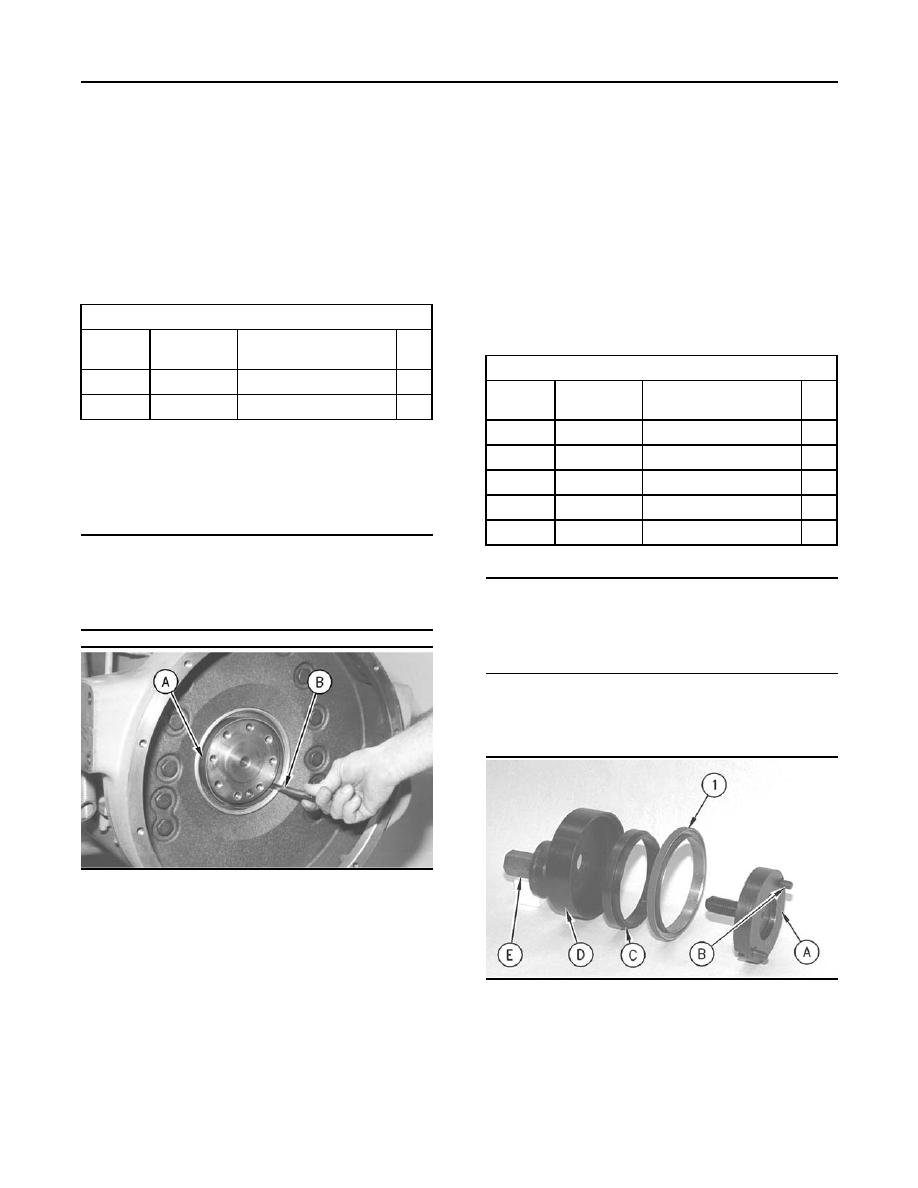
3. Remove Tooling (B), Tooling (A), and the
i01747309
crankshaft wear sleeve from the end of the
Crankshaft Wear Sleeve (Rear)
crankshaft.
- Remove
(If Equipped)
i01747314
Crankshaft Wear Sleeve (Rear)
SMCS Code: 1161-011-ZV
- Install
Removal Procedure
SMCS Code: 1161-012-ZV
Table 27
Installation Procedure
Required Tools
Part
Table 28
Tool
Part Description
Qty
Number
Required Tools
1
4C-4869
Distorter Ring
A
Part
1
5P-7312
B
Seal Distorter
Tool
Part Description
Qty
Number
1
132-8772
A(1)
Seal Locator
Start By:
1U-7596
B(1)
2
Bolt
a. Remove the crankshaft rear seal. Refer to
1U-7597
1
C(1)
Sleeve Ring
Disassembly and Assembly, "Crankshaft Rear
1U-7594
D(1)
1
Seal Installer
Seal - Remove".
1
9S-8858
E(1)
Nut
NOTICE
(1)
Part of the 1U-7598 Seal Installer
Keep all parts clean from contaminants.
NOTICE
Contaminants may cause rapid wear and shortened
Keep all parts clean from contaminants.
component life.
Contaminants may cause rapid wear and shortened
component life.
1. Ensure that the rear of the crankshaft is
thoroughly clean and dry prior to the installation
of the crankshaft rear seal.
g00614029
Illustration 132
Note: Wear sleeves are not installed at the factory.
The wear sleeve is included with the replacement
rear seal.
1. Install Tooling (A) in the bore of the crankshaft
g00613561
Illustration 133
rear sleeve.
2. Fasten Tooling (A) to the rear of the crankshaft
2. Install Tooling (B) between Tooling (A) and the
with Tooling (B). Hand tighten Tooling (B).
crankshaft wear sleeve. Turn Tooling (B) until
the edge of Tooling (B) makes a crease in the
3. Position the crankshaft rear seal and crankshaft
crankshaft wear sleeve. Make a crease in the
rear sleeve (1) on Tooling (A). Position Tooling
crankshaft wear sleeve at two other locations
(C) on Tooling (A).
around the crankshaft wear sleeve until the
crankshaft wear sleeve is loose.
|
|
Privacy Statement - Press Release - Copyright Information. - Contact Us |