 |
|||
|
|
|||
|
Page Title:
Figure 2-9. Floating seal installation tool. |
|
||
| ||||||||||
|
|
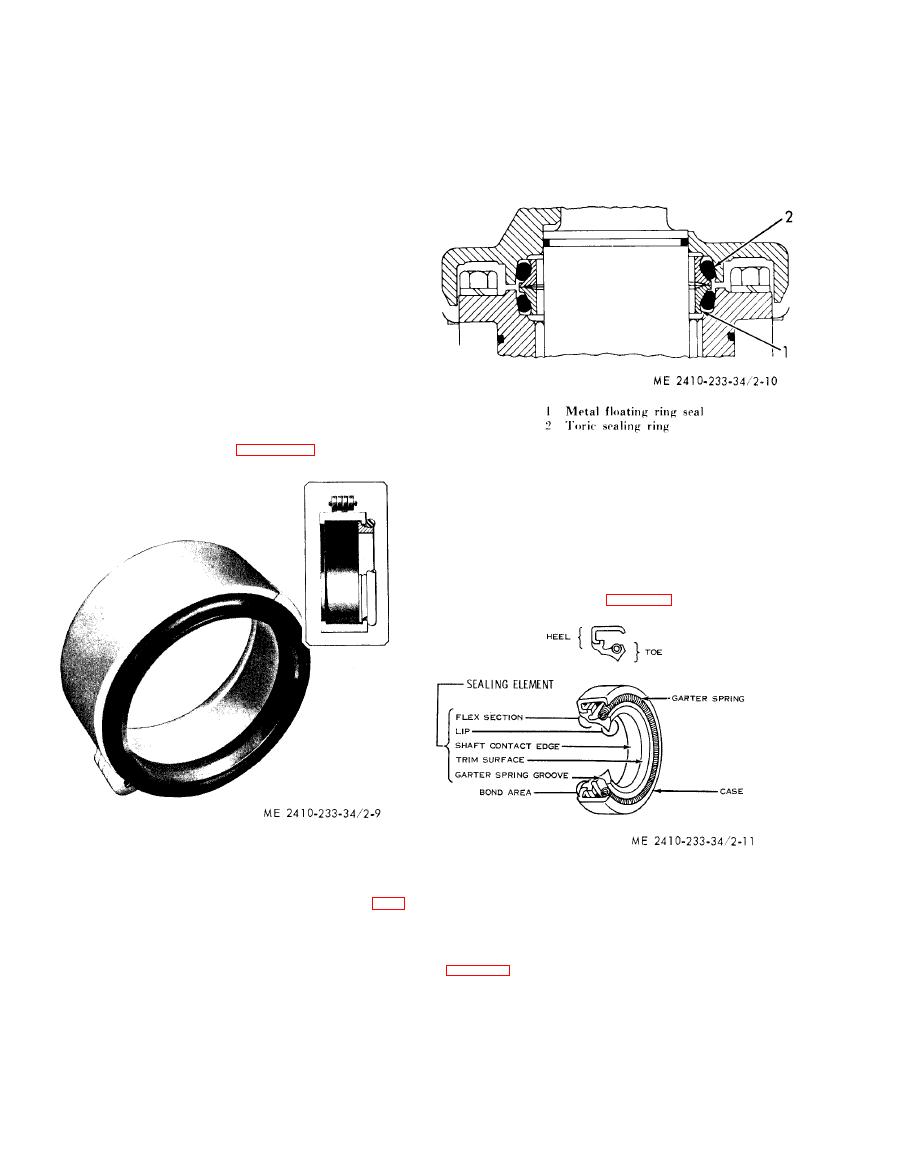 (i) B e f o r e a s s e m b l i n g f l o a t i n g r i n g s e a l s
(d) Handle all parts with care to avoid nicks.
together, wipe faces of seals with lint-free tissue to
File smooth any parts, other than the sealing faces,
remove any foreign material and fingerprints. Place
that have nicks that may make assembly difficult or
one drop of oil on the cleaning tissue and coat the
questionable. Wash used parts. Use a wire brush to
sealing surfaces of the seals. Be careful to prevent
clean dirt or rust from the bore of the seal retainers
any oil from contacting the toric sealing ring or its
to assure they are clean and smooth. Remove all oil
o r the protective coating from floating ring seals
mating
surfaces.
and retainers w i t h a nonflammable cleaning
solvent. Be sure the ramp on the retainers and on
t h e floating ring seals are dry.
(e) C h e c k t h e r a m p s f o r t o o l m a r k s a n d
n i c k s . on used parts, remove dirt or rust deposits
from the ramps. Smooth the surface with emery
cloth.
(f) Install new toric sealing rings or floating
ring seals. Scat the toric sealing ring uniformly in
the relief of the ring seal. Be sure the toric sealing
ring is not twisted. It must set straight against the
lip which keeps it from falling off the floating ring
seal.
(g) Floating seal installation tools are
available for various size seals. A t y p i c a l i n -
s t a l l a t i o n tool is shown in figure 2-9.
seal and toric sealing ring properly positioned.
(2) L i p - t y p e s e a l s .
(a) Generally the toe or spring-loaded lip of
an oil seal faces the oil being sealed or the oil having
the higher pressure. The toe or lip of a grease seal
faces away from the lubricant being sealed. Unless
otherwise specified, use the preceding rules for
i n s t a l l i n g lip-type seals (fig. 2-11).
(h) If an installer tool is not used, install the
toric sealing ring and floating ring seal as an
(b) The main parts of a lip-type seal are the
assembly by pressing on the toric sealing ring (fig.
case,
sealing element, and garter spring. The
2 - 1 0 ) . Use finger pressure only. Be sure the toric
picture illustrates the construction of a simple lip-
scaling ring is seated uniformly in the recess of both
type seal. The cross sections show the terms "heel"
the floating ring seal and the retainer. Make sure it
( f i g . 2 - 1 2 ) a n d " t o e " used to identify the sides of
s e t s in the bore straight and against the lip that
v a r i o u s types of seals.
k e e p s it from falling out of the retainer. DO NOT
USE A SCREWDRIVER OR STICK TO
ASSEMBLE THE TORIC SEALING RING IN
THE RETAINER.
|
|
Privacy Statement - Press Release - Copyright Information. - Contact Us |
