 |
|||
|
|
|||
|
Page Title:
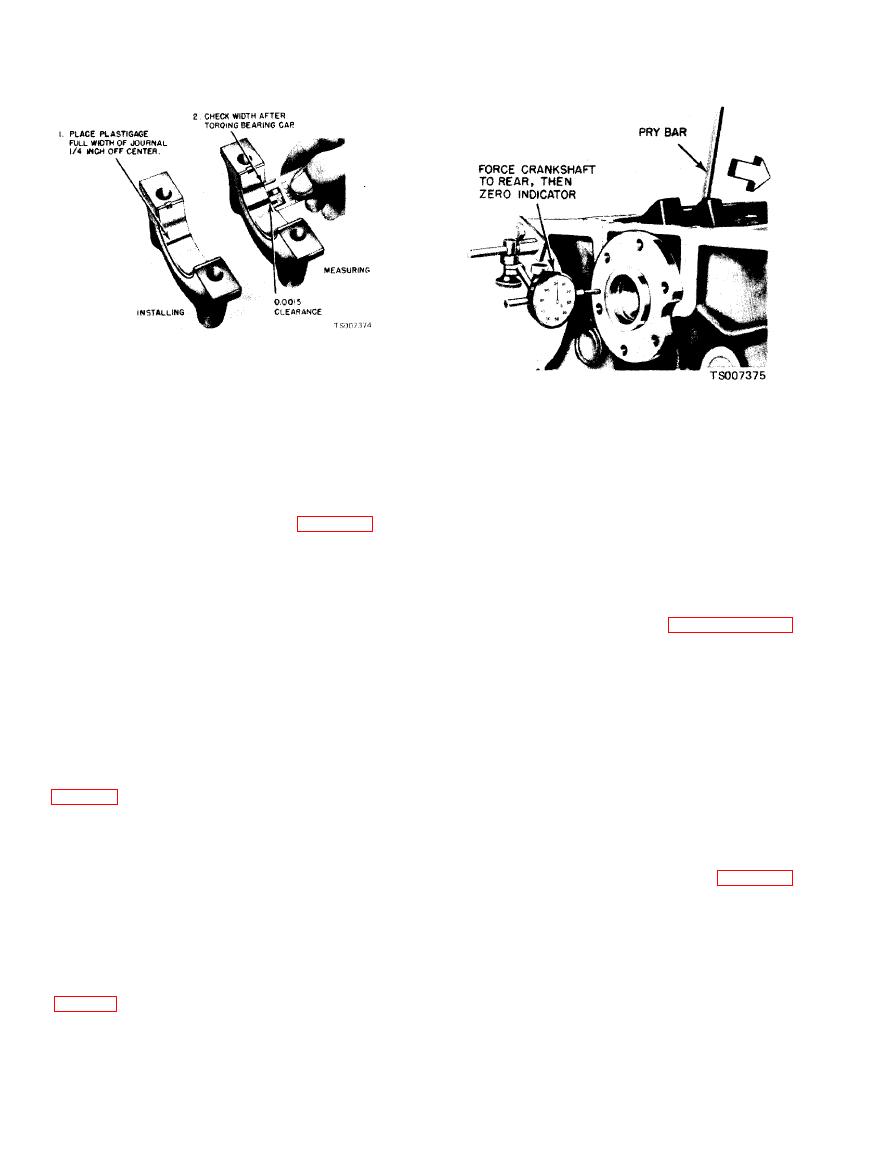
Figure 6-45. Fitting Bearings with Plastigage. |
|
||
| ||||||||||
|
|
 TM 10-3930-633-34
(2) Install cap and torque bolts to
specifications. Do not turn crankshaft while
Plastigage is in place.
(3) Zero the dial indicator. Push the
(3) Remove cap. Using Plastigage scale,
crankshaft forward and note the reading on the
check width of Plastigage at widest point to get
dial.
minimum clearance. Check at narrowest point to
(4) If the end play exceeds the wear limit,
get maximum clearance.. Difference between
replace the thrust bearing. If the end play is less
readings is taper of journals. See table 6-6.
than the minimum limit, inspect the thrust
(4) If clearance exceeds specified limits, try
bearing faces for scratches, burrs, nicks, or dirt.
0.001 or 0.002 inch undersize bearings in com-
If the thrust faces are not damaged or dirty, they
bination with the standard bearings. Bearing
probably were not aligned properly. Install the
clearance must be within specified limits. If 0.002
thrust bearing and align the faces following the
undersize main bearings are used on more than
procedure recommended under paragraph 6-29.
one journal, be sure they are all installed in
b. Flywheel Runout.
cylinder block side of bearing. If standard and
(1) Remove the spark plugs.
0.002 inch undersize bearings do not bring
(2) Install a dial indicator so that the in-
c l e a r a n c e w i t h i n d e s i r e d l i m i t s , refinish
dicator point rests on the face of the ring gear
c r a n k s h a f t journal, t h e n install undersize
adjacent to the gear teeth.
bearings.
(3) Push the flywheel and crankshaft for-
(5) After bearing has been fitted, apply light
ward or backward as far as possible to prevent
coat of engine oil to journal and bearings. Install
crankshaft end play from being indicated as
bearing cap. Torque cap bolts to specifications
flywheel runout.
(4) Set the indicator dial on the zero mark.
(6) Repeat procedures for remaining
Turn the flywheel one complete revolution while
bearings that require replacement.
observing the total indicator reading (TIR). If the
TIR exceeds specifications, the flywheel and ring
Check
gear assembly must be replaced. See table 6-6.
a. Crankshaft End Play.
(1) Force the crankshaft toward the rear of
If the crankshaft rear oil seal replacement is
the engine.
the only operation being performed, it can be done
(2) Install a dial indicator so that the contact
in the vehicle as detailed in the following
point rests against the crankshaft flange and the
procedure. If the oil seal is being replaced in
indicator axis is parallel to the crankshaft axis
c o n j u n c t i o n w i t h a rear m a i n bearing
|
|
Privacy Statement - Press Release - Copyright Information. - Contact Us |
