|
| |
TM 9-2320-360-34-1
NOTE
When properly positioned, S-cam opening in brake bracket will line up with
camshaft housing.
(7)
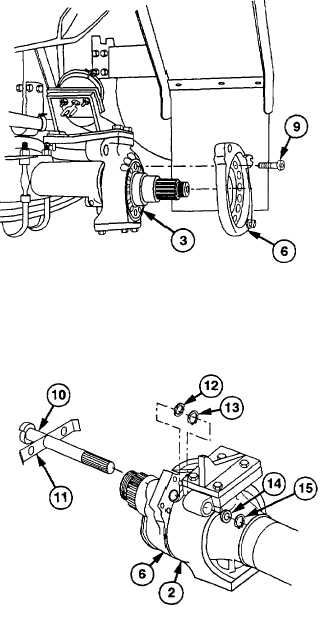
Position brake bracket (6) on spindle assembly (2).
WARNING
Adhesive-sealant can burn easily, can give off harmful vapors, and is harmful to
skin and clothing. To avoid injury or death, keep compound away from open fire
and use in well-ventilated area. If adhesive-sealant gets on skin or clothing, wash
immediately with soap and water.
(8)
Coat threads of 16 sockethead screws (9)
with adhesive-sealant.
(9)
Install 16 sockethead screws (9) on brake
bracket (6). Torque to 204 lb-ft (280
Nm).
(10)
Lightly coat brake camshaft (10) with
lubricating oil.
(11)
Position thrust washer (11) next to brake
bracket (6).
NOTE
Camshaft end should stick out back
of brake bracket. Do not insert
camshaft through spindle assembly
until step (14).
(12)
Insert camshaft (10) through thrust washer
(11)
and brake bracket (6).
WARNING
Wear eye protection and use care
when
removing
retaining
rings.
Retaining rings are under spring
tension and can act as projectiles
when released causing severe eye
injury.
(13)
Install washer (12) and retaining ring (13)
on camshaft (10).
(14)
Insert camshaft (10) through spindle
assembly (2) while sliding retaining ring
(13) and washer (12) in position on
camshaft (10).
(15)
Install spacer (14) and retaining ring (15)
on camshaft (10).
f.
Follow-on Maintenance
(1)
Install slack adjuster (TM 9-2320-360-20).
(2)
install brake shoes (TM 9-2320-360-20).
(3)
Install wheel hub (para 12-3).
(4)
Lubricate camshaft (LO 9-2320-360-12).
11-7
|