|
| |
TM 9-2320-360-34-1
WARNING
Adhesive-sealant can burn easily,
can give off harmful vapors, and is
harmful to skin and clothing. To
avoid injury or death, keep away from
open fire and use in well-ventilated
area. If adhesive sealant gets on skin
or clothing, wash immediately with
soap and water.
(4)
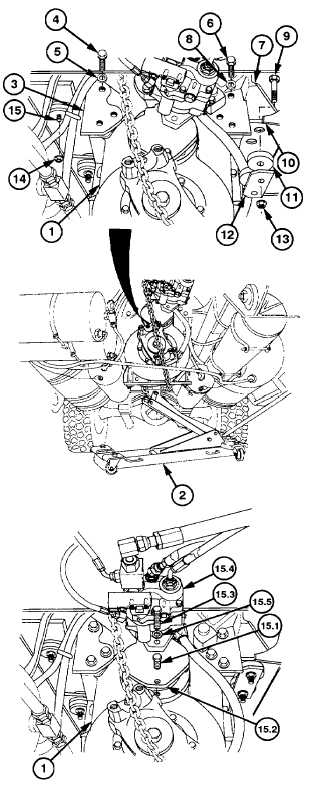
Coat threads of six screws (4) with
adhesive-sealant (Item 5, Appendix B).
(5)
Install six washers (5) and screws (4)
through front and back of left transfer case
support bracket (3) and into transfer case
(1). Do not tighten.
(6)
Coat threads of six screws (6) with
adhesive-sealant (Item 5, Appendix B).
(7)
Install right transfer case support bracket
(7) on transfer case (1) with six washers
(8) and screws (6). Do not tighten.
(8)
Tighten 12 screws (4 and 6) to 187 lb-ft
(252 Nm).
(9)
Install
two
screws
(9)
through
right
transfer case support bracket (7) and right
transfer case mounting bracket (10).
(10)
Lower transfer case (1) on mounting
bracket (10) and remove transmission lift
(2).
(11)
Install two mounting biscuits (11), one
plate (12), and two new locknuts (13) on
right mounting bracket (10). Torque to
212 lb-ft (286 Nm).
(12)
Remove two locknuts (14) from two
screws (15) on left transfer case support
bracket (3) and replace with new locknuts
(14). Torque to 212 lb-ft (286 Nm).
NOTE
·
Do step (12.1) if new transfer case
is being installed.
·
Save cover plate for use with old
transfer case.
(12.1)
Remove two screws (15.1) and cover
plate (15.2) from transfer case (1).
(12.2)
Coat threads of two screws (15.3) with
adhesive-sealant (Item 6, Appendix B).
(12.3)
Coat face of auxiliary steering pump (15.4)
with adhesive-sealant (Item 3, Appendix
B) and install on transfer case (1) with two
washers (15.5) and screws (15.3).
Change 3 8-11
|