|
| |
TM 9-2320-360-34-1
6-4. STARTER REPAIR (CONT)
WARNING
Adhesive-sealant can burn easily, can give off harmful vapors, and are harmful to
skin and clothing. To avoid injury or death, keep away from open fire and use in
well-ventilated area. If adhesive-sealant gets on skin or clothing, wash
immediately with soap and water.
(13)
Coat threads of screws (18) with adhesive-sealant (Item 6, Appendix B).
(14)
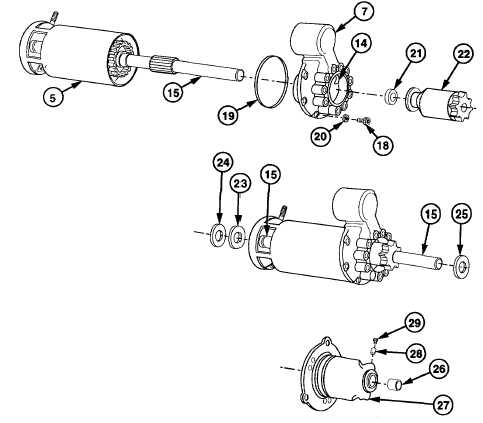
Install new preformed packing (19) and shift housing (7) on field ring (5) with five new lockwashers (20) and
screws (18).
(15)
Slide armature shaft (15) into shift housing (7) until 0.5 in. (12.7 mm) of shaft is visible.
(16)
Install brake washer (21) on armature shaft (15).
(16.1)
Coat splines of armature shaft (15) and drive assembly (22) with grease.
(16.2)
Coat brake washer (21) and drive assembly (22) contact surface with grease.
NOTE
Shaft may have to be rotated to align splines on shaft and drive.
(17)
Swing shift lever cams (14) out of shift housing (7) and position drive assembly (22) on cams (14) and
armature shaft (15).
(18)
Install fiber washer (23) and thrust washer
(24) on armature shaft (15).
(19)
Install thrust washer (25) on armature
shaft (15).
NOTE
· Do step (20) if bushing was
removed.
· Hole in bushing is off center.
Narrow edge goes in first.
· Hole in bushing must be aligned
with wick bore in nose housing.
(20)
Install bushing (26) in nose housing (27).
(21)
Soak wick (28) in lubricating gear oil.
(22)
Install wick (28) and plug (29) in nose
housing (27).
6-38 Change 2
|