|
| |
TM 9-2320-36-34-1
5-2. RADIATOR TEST/REPAIR (CONT)
NOTE
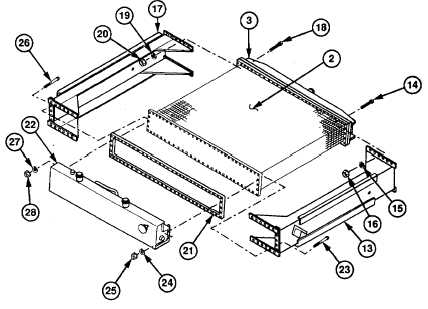
When properly installed, fan shroud mounting holes in side members should be on
same side as shroud mounting brackets. Radiator tie rod brackets should be
positioned toward top tank.
(5)
Position left column (13) on bottom tank (3) with 15 screws (14), new lockwashers (15), and nuts (16) with
aid of assistant. Do not tighten.
(6)
Position right column (17) on bottom tank (3) with 15 screws (18), new lockwashers (19), and nuts (20) with
aid of assistant. Do not tighten.
WARNING
Adhesive-sealant can burn easily, can give off harmful vapors, and Is harmful to
skin and clothing. To avoid injury or death, keep away from open fire and use In
well-ventilated area. If adhesive-sealant gets on skin or clothing, wash
immediately with soap and water.
(7)
Coat ends and joint of gasket (21) with adhesive-sealant.
(8)
Position gasket (21) on radiator core (2).
(9)
Position top tank (22) on left column (13) with three screws (23), new lockwashers (24), and nuts (25). Do
not tighten.
(10)
Position top tank (22) on right column (17) with three screws (26), new lockwashers (27), and nuts (28). Do
not tighten.
5-8
|