|
| |
TM 9-2320-360-34-1
4-6. BLOWER REPLACEMENT
This task covers:
a. Removal
c. Follow-On Maintenance
b. Installation
INITIAL SETUP
Equipment Conditions
Materials/Parts
Rocker covers removed (TM 9-2320-360-20).
Grease, Automotive and Artillery (Item 32,
Air inlet adapter removed (para 4-5).
Appendix B)
Fuel pump removed (para 4-4).
Connector (Item 9, Appendix F)
Tachometer drive gear removed (para 3-25).
Gasket (Item 49, Appendix F)
Blower accessory drive hub removed
Ring, Retaining (Item 245, Appendix F)
(para 4-9).
Ring, Seal (Item 270, Appendix F)
Tools and Special Tools
Personnel Required
Tool Kit, Genl Mech (Item 202, Appendix E)
Two
Goggles, Industrial (Item 57, Appendix E)
Tool, Alignment, Blower Shaft (Item 195,
Appendix E)
Wrench, Torque, 0-175 Lb-Ft (Item 236,
Appendix E)
Wrench, Torque, 0-300 Lb-In. (Item 235,
Appendix E)
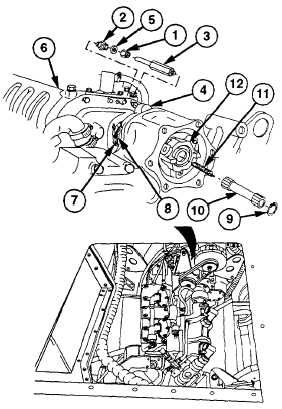
a.
Removal
(1)
Loosen nut (1) on adapter (2).
(2)
Remove connector (3) from blower drive
support (4).
(3)
Remove adapter (2), nut (1), seal ring (5)
and
connector
(3)
from
blower
(6).
Discard seal ring, nut, connector, and
adapter.
(4)
Loosen clamp (7) on seal ring (8).
WARNING
Wear protective goggles and use
care when removing retaining rings.
Retaining rings are under spring
tension and can act as projectiles
when released causing severe eye
injury.
(5)
Remove retaining ring (9) from blower
drive shaft (10). Discard retaining ring.
NOTE
Spring may fall out when shaft is
removed.
(6)
Remove blower drive shaft (10) and spring
(11) from drive adapter (12).
4-19
|