|
| |
TM 9-2320-360-34-1
3-19. OIL COOLER AND HOUSING REPAIR (CONT)
NOTE
Do step (12) if studs were removed.
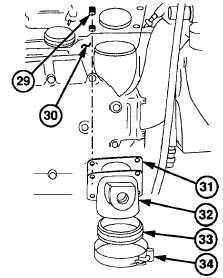
(12)
Install two studs (29) on engine block (30).
(13)
Place new gasket (31) over studs (29).
(14)
Position flange elbow (32), new seal (33),
and new clamp (34) on engine block (30).
(15)
Install two new lockwashers (35) and nuts
(36) on studs (29). Do not tighten.
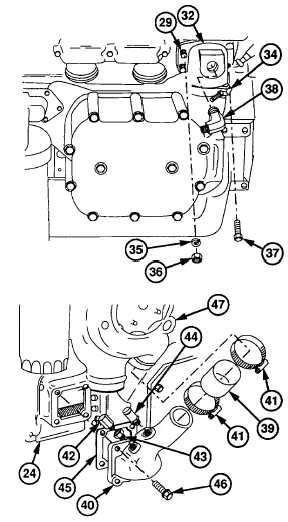
(16)
Install two screws (37) on flange elbow
(32). Torque to 30-35 Ib-ft (41-47 Nm).
(17)
Tighten two nuts (36) to 30-35 Ib-ft (41-47
Nm).
WARNING
Pipe thread sealing compound can
burn easily, can give off harmful
vapors, and is harmful to skin and
clothing. To avoid injury or death,
keep away from open fire and use in
well-ventilated area. If pipe thread
sealing compound gets on skin or
clothing, wash immediately with soap
and water.
(17.1)
Coat threads of elbow (38) with pipe
thread sealing compound.
(18)
Install elbow (38) in flange elbow (32).
(19)
Tighten clamp (34).
(20)
Install hose (39) on oil cooler inlet elbow
(40) with two clamps (41). Do not tighten.
(21)
Coat threads of elbow (42), bushing (43),
and fitting (44) with pipe thread sealing
compound.
(22)
Install bushing (43), elbow (42), and fitting
(44) on oil cooler inlet elbow (40).
(23)
Install new gasket (45) and oil cooler inlet
elbow (40) on oil cooler (24) with four
screws (46).
(24)
Install hose (39) on water pump (47) with
two clamps (41).
3-114
|