
TM 5-3815-221-14&P
the wedge is in its final position. When seated properly
wedge will just protrude beyond the end of the socket
4. Cut a piece of rope and secure it to the end of the with
two clamps as shown in Figure 6.
PITCH BRACES
Install the pitch braces as follows:
1. Note that three holes have been provided in the d stick
for dipper pitch adjustment (Figure 1). Position back hoe
boom over rear of crawlers and extend dipper ha until
dipper teeth are in the vertical position.
2. Lower dipper to ground and remove hardware v
secures brace to dipper handle.
3. To shorten braces, move crawler backward slowly
holes in braces are aligned with holes in dipper hand
4. To lengthen braces, move crawler forward slowly.
5. When the holes are aligned, install the pin, washer
cotter pins.
REMOVING BACKHOE ATTACHMENT
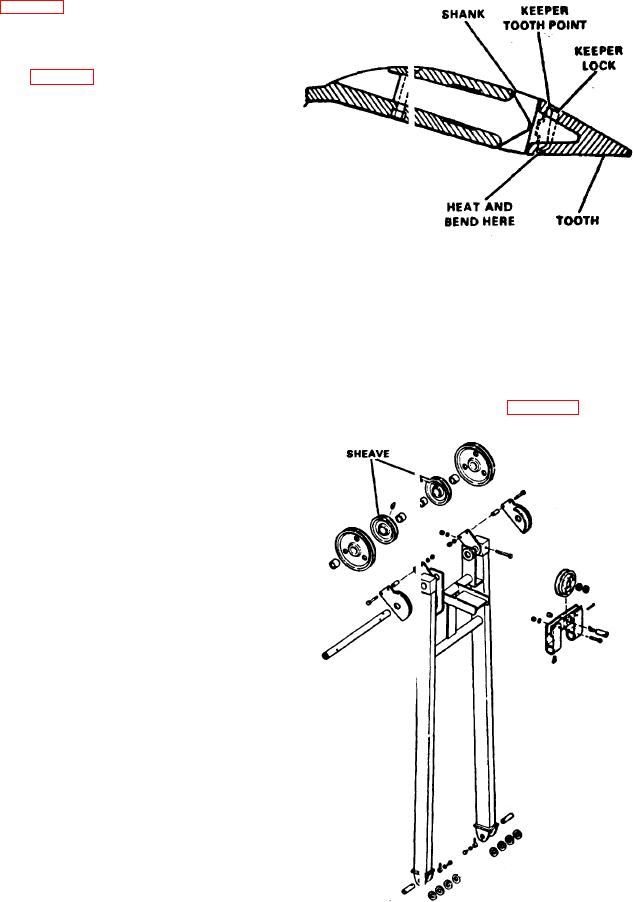
Figure 7. Dipper Tooth Replacement
To remove the backhoe attachment, proceed as folloows
1. Pull dipper in under boom and lower dipper to ground
4. Install the tooth point keeper and wedge in with lock
Provide blocking between dipper and dipperstick.
keeper. Heat section of lock keeper indicated to glowing
2. Remove cable from both drums. Roll cable into a coil
red, then bend tang as shown
secure with wire. Label the cable for future use.
3. Crib backhoe boom to support it for removal from the
GANTRY ASSEMBLY
revolving frame.
4. Drive a wedge between cribbing and boom to remove
If the gantry is disassembled for sheave or pin
weight of boom from boom foot pins.
replacement, install sheave (see Figure 8) so grease
5. Remove boom foot pins. Slowly back machine away
fitting is facing toward center line of gantry.
boom.
6. Slack off on boom hoist cable and lower auxiliary
gantry onto blocking on both ends.
7. Remove backstop assembly from auxiliary gantry and
machine.
8. Crib auxiliary gantry to support it for removal from the
revolving frame.
9. Unreeve boom hoist cable from gantry. Slowly take
boom hoist drum to unreeve cable.
10 Drive a wedge between cribbing and gantry to remove
weight of gantry from gantry foot pins.
11. Remove gantry foot pins. Slowly back machine from
gantry.
DIPPER TOOTH REPLACEMENT
Dipper teeth must be replaced when worn to one-third
original length. To replace the teeth, proceed as follow
Figure 7):
1. Drive the tooth lock keeper and tooth point keeper out
of the tooth shank
2 Remove the tooth from the shank.
3. Install a new tooth on shank.
Figure 8. Gantry (2100N522)
6