 |
|||
|
|
|||
|
|
|||
| ||||||||||
|
|
 TM 5-2410-237-23
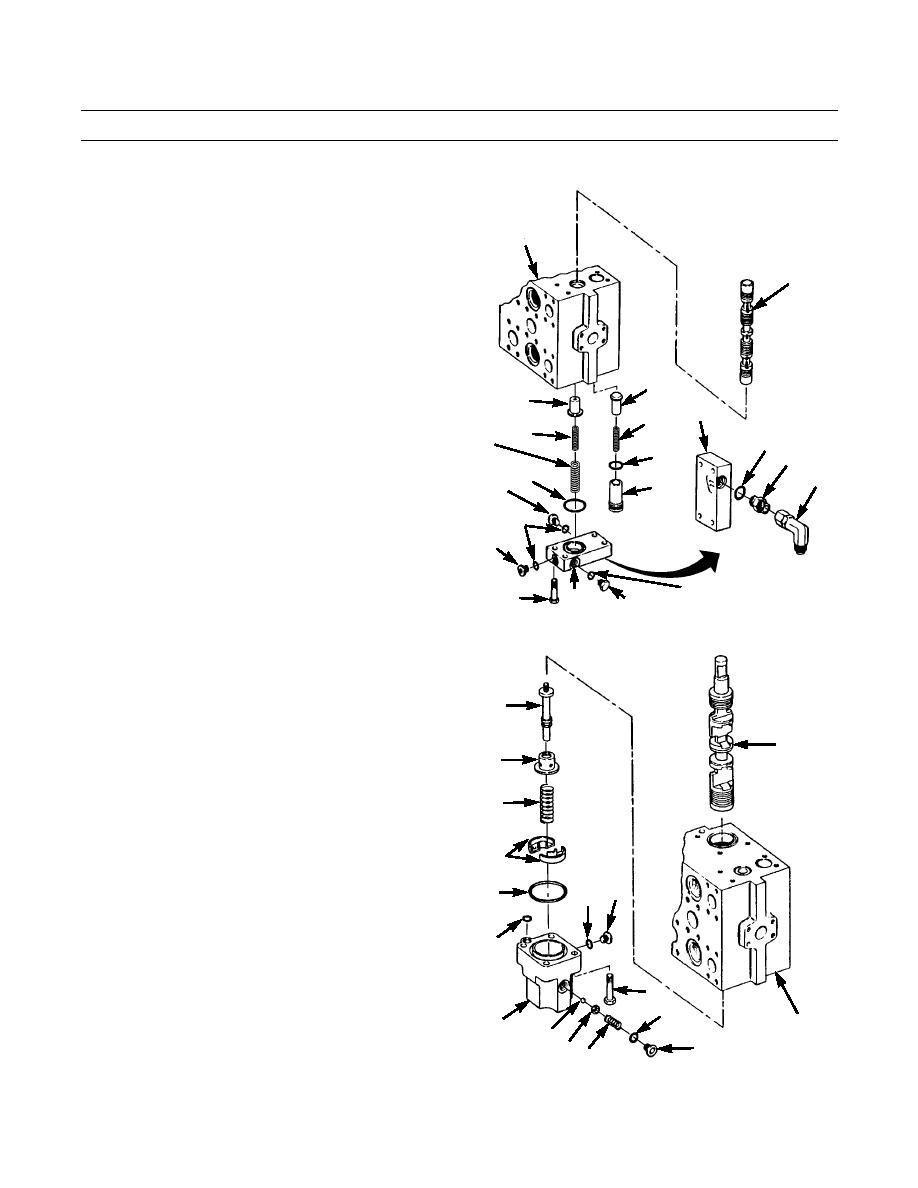
BLADE CONTROL VALVE (LIFT AND TILT) REPAIR - CONTINUED
0245 21
ASSEMBLY - CONTINUED
4.
Carefully insert spool (110) into main valve body (30).
5.
If equipped with ripper, install new O-ring (107) on
30
adapter (106) and install adapter in cover (94).
6.
Apply antiseizing tape to elbow (105) and install
110
elbow on adapter (106).
7.
If equipped with winch, install new O-ring (109) on
plug (108) and install plug in cover (94).
8.
Install new O-ring (104) on each of two plugs (103)
and install plugs in cover (94).
102
98
9.
Install new O-ring (100) on plug (99). Use a 3/8-
94
101
16NC x 2 in. long capscrew to install valve (102), new
97
96
spring (101) and plug on one side of main valve body
107
100
106
(30).
105
103 95
99
10.
Install retainer (98), new inner spring (97), and new
outer spring (96) in main valve body (30).
104
11.
Install new O-ring (95) on cover (94).
103
12.
Install cover (94) on one side of main valve body (30)
with four bolts (93).
109
93
94
108
421-0067
13.
Repeat steps 5 through 12 for cover (94) on other side
of main valve body (30).
14.
Apply sealing compound to threads of bolt (91) and
install bolt in end of spool (88). Install retainer (92)
and new spring (89) over bolt. Compress spring and
91
install retainers (90) in groove of bolt.
15.
Carefully insert spool (88) into main valve body (30).
88
16.
Install new O-ring (84) to plug (80) and install ball
92
(83), seat (82), new spring (81) and plug in one side of
spool end housing (78).
89
17.
Repeat step 16 on other side of spool end housing
(78).
90
18.
Install new O-ring (79) on plug (77) and install plug in
spool end housing (78).
77
86
79
19.
Install new large O-ring (86) and new small O-ring
(87) in face of spool end housing (78), and install
spool end housing on main valve body (30) with four
87
capscrews (85).
85
84
30
78
83
80
82 81
421-0066
0245 21-9
Change 1
|
|
Privacy Statement - Press Release - Copyright Information. - Contact Us |
