 |
|||
|
|
|||
|
|
|||
| ||||||||||
|
|
 TM 10-3930-633-34
if the unit is equipped with loose needle bearings.
in the clutch piston for free movement. Check the
Assemble two seal rings in the front grooves.
orifice to make sure it is not plugged.
(10) Install the steel and the bronze thrust
( 2 ) Check the fluid passages for ob-
washers on the front of the secondary sun gear
structions. All fluid passages must be clean and
assembly. If the steel washer is chamfered, place
free of obstructions.
the chamfered side down.
(3) Inspect the clutch plates for wear and
scoring and check the plates for fit on the clutch
7-23. Front Clutch
hub serrations. Replace all plates that are badly
a. Disassembly.
scored, worn or do not fit freely in the hub
(1) Remove the clutch cover snap rings with
serratio ns.
a screwdriver, and remove the input shaft from
(4) Inspect the clutch pressure plate for
the clutch drum.
scores on the clutch plate bearing surface. Check
(2) Remove the thrust washer from the
the clutch release spring(s) for distortion.
thrust surface of the clutch hub. Insert one finger
(5) Inspect the needle bearing for worn
in the clutch hub, and lift the hub straight up to
rollers.
remove the hub from the clutch drum.
c. Assembly.
(3) Remove the composition and the steel
(1) Install new inner and outer seal rings on
clutch plates, and then remove the pressure plate
the piston.
from the clutch drum.
(2) Lubricate seals and install piston into
(4) Place the front clutch spring compressor
cylinder, being careful not to damage seal rings.
on the release spring. Position the clutch drum on
(3) Install the clutch release spring, and
the bed of an arbor press, and compress the
position the retainer on the spring.
release spring with the arbor press until the
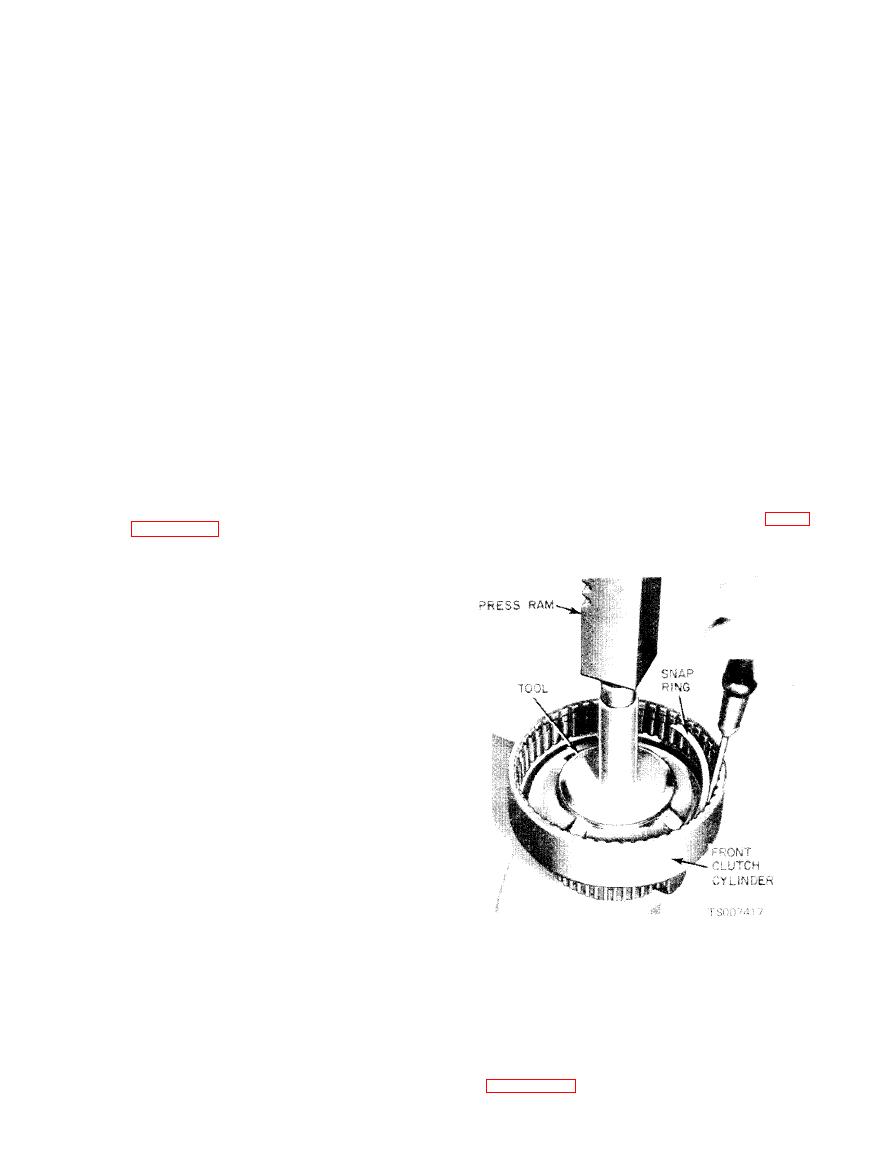
(4) Install the tool on the spring retainer as
release spring snap ring can be removed (fig. 7-
shown in figure 7-28. Compress the clutch spring,
29).
and install the snap ring. While compressing the
spring, guide the retainer to avoid interference of
the retainer with the snap ring groove. Make sure
the snap ring is fully seated in the groove. When
new composition clutch plates are used, soak the
plates in automatic transmission fluid for 15
minutes before they are assembled.
( 5 ) Install the external tabbed waved
cushion spring. Then, install the composition and
the steel clutch plates alternately, starting with a
steel plate.
(6) Install the clutch pressure plate with the
bearing surface down. Then install the clutch
pressure plate snap ring. Make sure the snap ring
is fully seated in the groove.
(7) Check the free pack clearance between
the pressure plate and the first internal plate with
a feeler gage. The clearance should be 0.030-0.055
inch. If the clearance is not within specifications,
selective snap rings are available in the following
thicknesses: 0.060-0.064, 0.074-0.078, 0.088-
0.092 and 0.102-0.106 inch. Insert the correct size
snap ring and recheck the clearance.
(8) Install the thrust washer on the primary
(5) Remove the clutch release spring from
sun gear shaft. Be sure the thrust washer is in-
the clutch drum.
stalled with the tabs of the washer away from the
(6) The piston can be forced out of the
sun gear thrust face. Lubricate all parts with
housing with air pressure. Place the nozzle
automatic transmission fluid or petroleum jelly.
against the clutch apply hole in the front clutch
Install the two center seal rings.
housing, and force the piston out of the housing.
(9) Install the rear clutch on the primary sun
See figure 7-30.
gear shaft. Be sure all of the needles are in the hub
|
|
Privacy Statement - Press Release - Copyright Information. - Contact Us |
