 |
|||
|
|
|||
|
Page Title:
Checking Camshaft Gear Backlash. |
|
||
| ||||||||||
|
|
 t o r q u e of 210 to 250 foot-pounds. Tap the pulley
(5) Remove the bolt (1) and washer (2) and
r e m o v e the pulley assembly. Remove six bolts (3)
with a soft hammer and retighten to the same
and lockwashers (4) and separate the vibration
damper (5) from the pulley (6).
(9) Install the vibration damper (5) to th
p u l l e y (6) and secure with six bolts (3) and lock-
(6) Remove four bolts (7) and lockwashers
washers (4).
(8) and remove the front support (9).
( 1 0 ) Install the cover (21) and a new gasket
(7)
Remove
the
bolts
(10)
and
lockwashers
( 2 2 ) and secure with four nuts (19) and washers
(11) which secure the oil pan (12) to the timing
(20).
gear cover. Loosen the remaining bolts which
secure the oil pan to the cylinder block, Using a thin
(11) Install the water Pump (5-6), fan belts
knife or screwdriver, carefully separate the oil pan
(5-5) and generator (TM 5-2410-233-20).
a n d gasket from the timing gear cover.
(12) Install the engine (para 2-8).
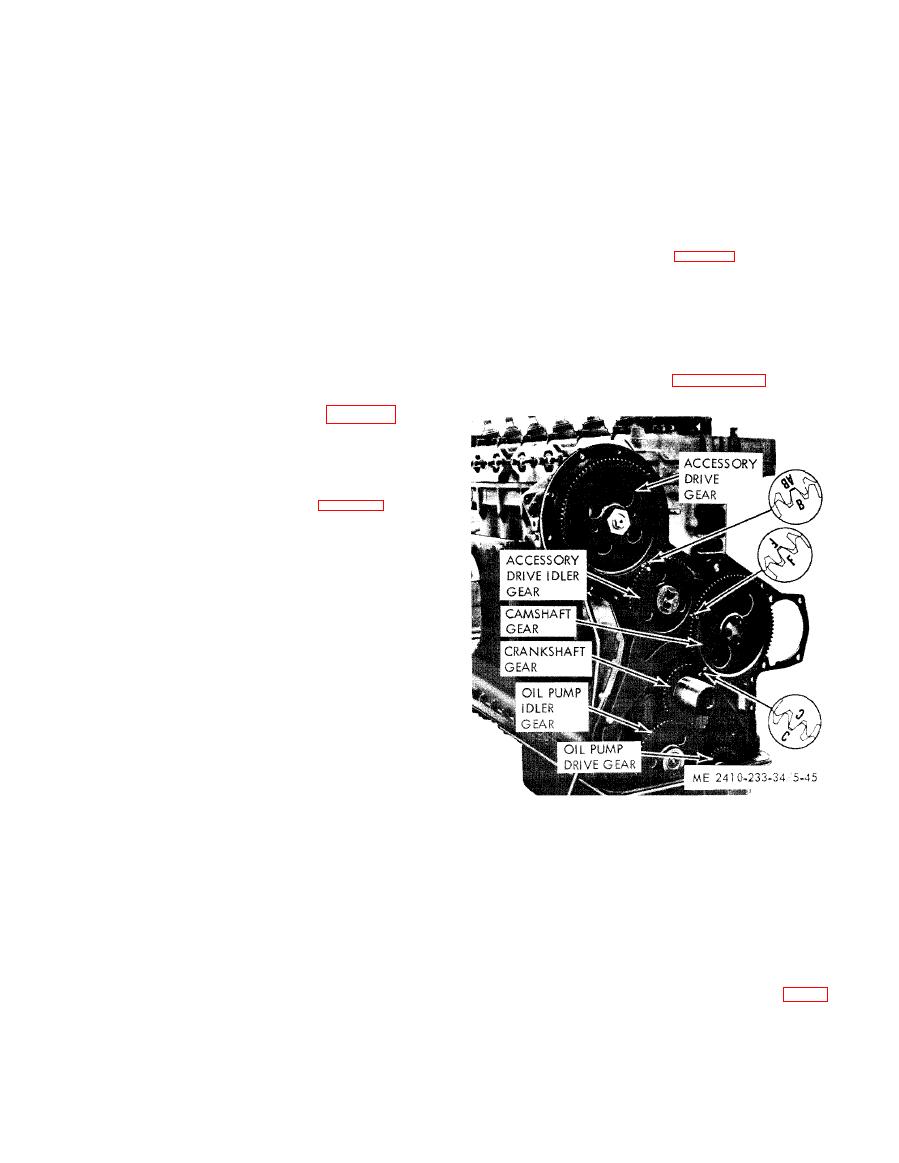
d. Timing Mark Alignment.
b. Inspection and Repair.
(1) Inspect the timing gear cover for chips,
(1) Remove the timing gear cover (subpara
a, above).
cracks, and other damage and for distortion.
Repair as required.
( 2 ) Rotate the crankshaft in the direction of
engine rotation until the No. 1 piston is at top dead
(2) Inspect the timing gears for broken or
missing teeth, excessive or uneven wear and cracks,
center on the compression stroke and the timing
marks are matched, Refer to figure 5-45.
chips and other damage. Repair or replace as
required.
(3) Inspect the seal (item 18, fig, 5-44) for
d a m a g e and deterioration and replace if necessary.
(4) Inspect the crankshaft pulley and
v i b r a t i o n damper for damage and wear. Repair or
r e p l a c e as required.
c. Reassembly and Installation (fig. 5 - 4 4 ) .
(1) Heat the camshaft gear (34) and install on
t h e camshaft. Align the timing marks (subpara e ) .
Secure with four camshaft gear retaining bolts (32)
and
the
lock
(33).
Check
the
gear
backlash
(subpara f).
(2) Install the plate (30), spacer (31), and
accessory drive idler gear (29). Secure with two
bolts (27) and locks (28).
( 3 ) Install the washer (25), retainer (26), and
the accessory drive gear (24) on the accessory drive
s h a f t . Align the timing mark on the gear with the
timing mark on the idler gear (28). Refer to
s u b p a r a g r a p h e. Install the retaining nut (23) and
tighten to a torque of 90 to 110 foot-pounds.
(4) Install a new mounting gasket (17),
Install the timing gear cover (16) to the engine
block and plate, and secure with bolts (13),
washers (14) and lockwashers (15).
(5) Install the bolts (10) and lockwashers
(3) If the timing marks are not properly
(11) which secure the oil pan (12) to the timing
aligned, remove
and reinstall the gears as
gear cover, Tighten the remaining bolts which
necessary.
s e c u r e the oil pan to the cylinder.
e. Checking Camshaft Gear Backlash.
( 6 ) Install a new seal (18) in the timing gear
( 1 ) Check the backlash between the camshaft
cover (16) if the old seal was removed. Using a
g e a r and the crankshaft gear by installing a dia
sleeve to protect the seal, install the seal with the
i n d i c a t o r , Backlash should be 0.001 to 0.010 inch
s p r i n g - l o a d e d lip toward the cylinder block.
(2) If backlash is excessive, check for worn
(7) Install the front support (9), securing with
t i m i n g gears, bearings or camshaft bearings (para
four bolts (7) and lockwashers (8).
5-27).
(8) Press on the pulley (6) and secure with the
bolt (1) and washer (2). Tighten the bolt to a
|
|
Privacy Statement - Press Release - Copyright Information. - Contact Us |
