 |
|||
|
|
|||
|
|
|||
| ||||||||||
|
|
 TM 9-2320-363-20-2
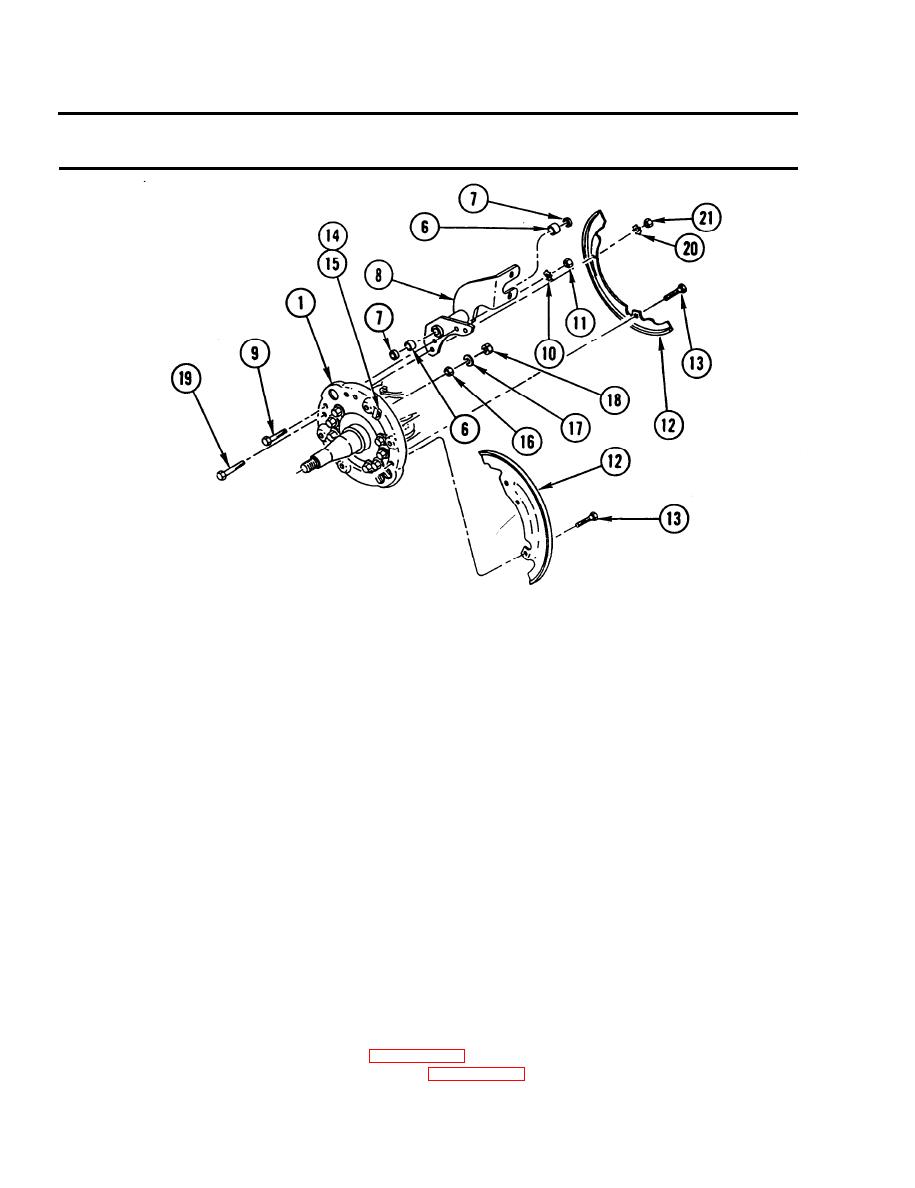
FRONT BRAKE SPIDER AND BRAKE CHAMBER BRACKET REPLACEMENT
(CONT)
APPLY LIGHT COATING OF OIL TO TWO BUSHINGS (6) AND TWO NEW SEALS (7).
3.
INSTALL TWO BUSHINGS (6), WITH LABEL ENDS FACING EACH OTHER, IN BRAKE CHAMBER
4.
BRACKET (8) TO DEPTH OF 0.375 IN. (9.5 mm) FROM EACH END OF BRAKE CHAMBER
BRACKET (8).
INSTALL TWO NEW SEALS (7) IN BRAKE CHAMBER BRACKET (8) WITH LIP OF BOTH SEALS (7)
5.
FACING TOWARD VEHICLE.
INSTALL BRAKE CHAMBER BRACKET (8) ON BRAKE SPIDER (1) AS NOTED DURING REMOVAL,
6.
STEP 5.
INSTALL TWO CAPSCREWS (9), TWO NEW LOCK WASHERS (10), AND TWO NUTS (11).
7.
APPLY LIGHT COATING OF GAA TO TWO BUSHINGS (6) IN BRAKE CHAMBER BRACKET (8).
8.
INSTALL 2-PIECE DUST SHIELD (12) AND TWO CAPSCREWS (13) ON BRAKE SPIDER (1).
9.
INSTALL TWO CLAMPS (14), TWO CAPSCREWS (15), AND TWO NUTS (16) ON BRAKE SPIDER (1).
10.
INSTALL TWO NEW LOCK WASHERS (17) AND TWO NUTS (18) ON BRAKE SPIDER (1).
11.
INSTALL TWO CAPSCREWS (19), TWO NEW LOCK WASHERS (20), AND TWO NUTS (21).
12.
.
NOTE
Follow-on Maintenance:
Install front air brake chamber (page 4-420).
I n s t a l l front slack adjuster and S-cam (page 4-437).
4-430
|
|
Privacy Statement - Press Release - Copyright Information. - Contact Us |
