 |
|||
|
|
|||
|
|
|||
| ||||||||||
|
|
 TM 9-2320-360-34-2
WARNING
Sealing compound can burn easily,
can give off harmful vapors, and is
harmful to skin and clothing. To
avoid injury or death, keep away from
open fire and use in well-ventilated
area. If sealing compound gets on
skin or clothing, wash immediately
with soap and water.
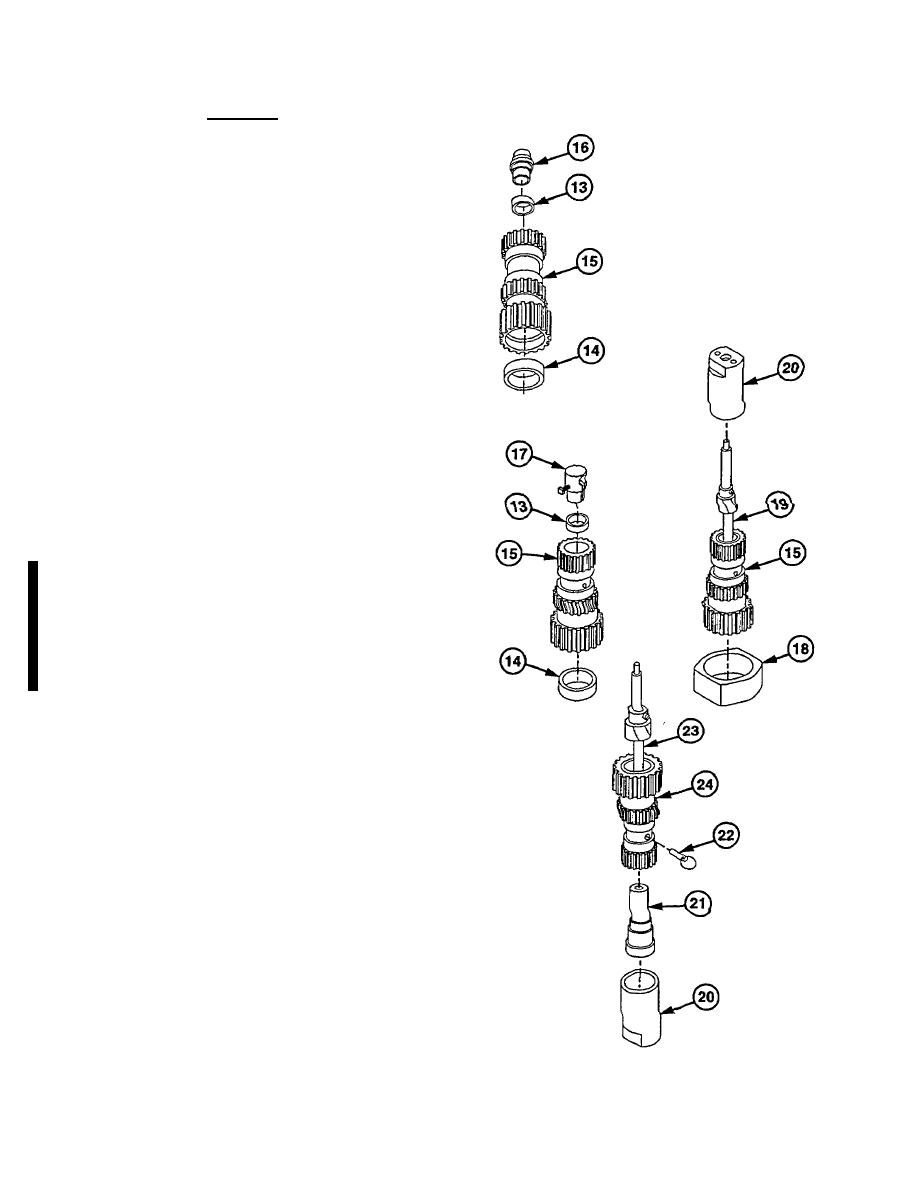
(8) Coat bushings (13 and 14) with sealing
compound.
(9) Position bushing (13) at bore of small end
of sun gear shaft (15). Align interlock split
so bushing is more than 45 degrees from
swaging hole in sun gear shaft.
(10) Press in bushing (13) using end of
bushing installer tool (16) marked 0.360.
(11) Install bushing (14) in larger end of sun
gear shaft (15) using end of bushing
installer tool (16) marked 0260. Align
interlock split so bushing is more than 45
degrees from swaging hole in sun gear
shaft.
(12) Push both bushings (13 and 14) in
swaging holes of sun gear shaft assembly
(15) using swaging tool (17).
NOTE
Bushing
PN
6835323
requires
machining before final assembly,
continue with step (13). Bushing PN
29506041 is pre-bored and does not
require machining, continue with
Gear Unit and Main Shaft assembly.
(13) Clamp holding fixture (18) in vise. Set sun
gear shaft (15) in holding fixture with small
end up. Position sun gear bushing reamer
(19) and pilot tool (20) in sun gear shaft
(15).
CAUTION
Keep reamer rotating at full drill
speed when pulling back through
bushing. If reamer is not rotating at
full drill speed, bushing could be
damaged.
(14) Machine bushing at approximately 75 to
150 rpm while adding oil through either
hole on top of pilot tool (20) using 1/2 in.
(13 mm) electric drill.
(15) Clamp pilot tool (20) in vise.
Insert
bushing pilot tool (21) in small end of sun
gear shaft (15) and hold with locking pin
(22). Position bushing pilot tool (21) in
pilot tool (20), and position reamer and
shaft assembly (23) in sun gear shaft.
Change 2 22-93
|
|
Privacy Statement - Press Release - Copyright Information. - Contact Us |