 |
|||
|
|
|||
|
|
|||
| ||||||||||
|
|
 TM 9-2320-360-34-2
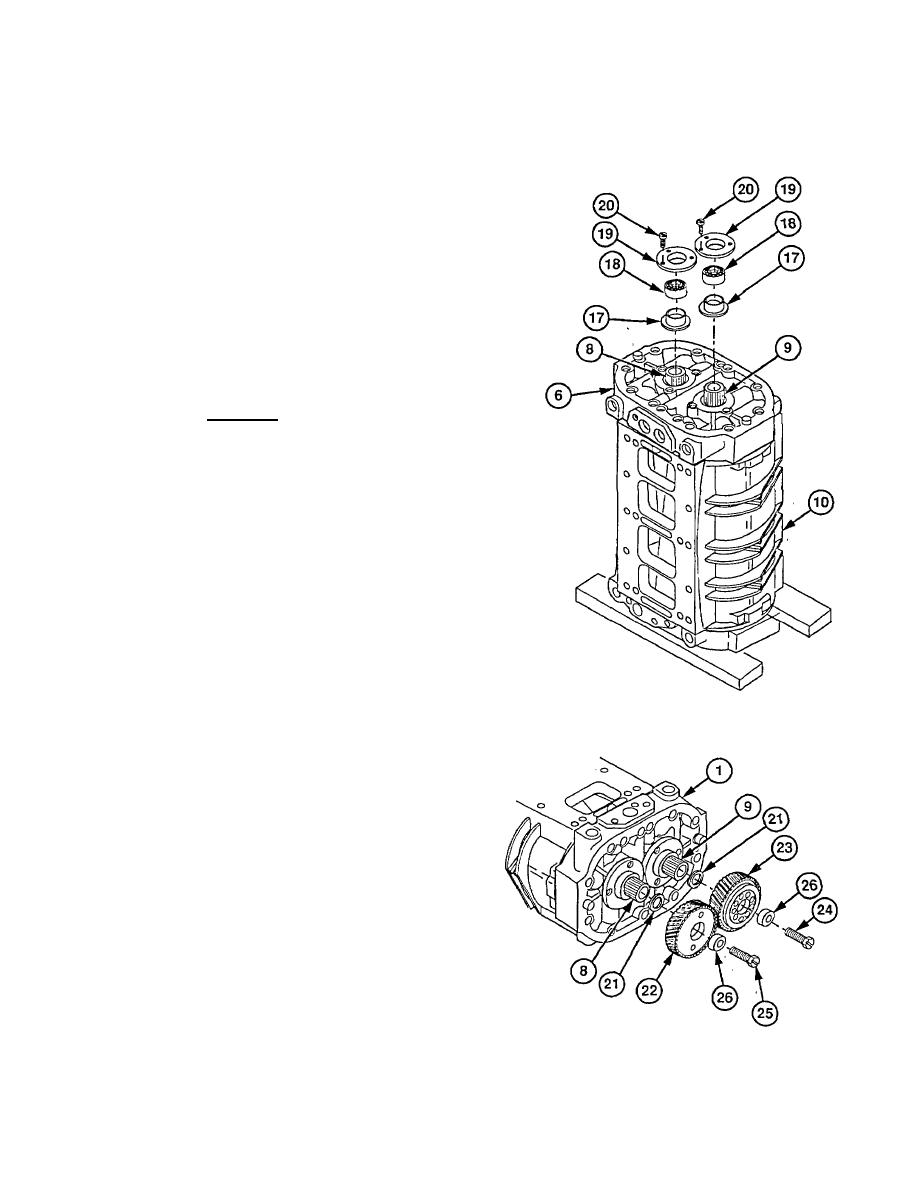
(20) Turn blower (10) over on wooden blocks so front
end plate (6) faces up.
(21) Install two bearing collars (17) on rotors (8 and
9).
(22) Coat two roller bearings (18) with lubricating oil.
(23) Install roller bearings (18) over rotors (8 and 9)
and in front end plate (6).
NOTE
Flanges on reflectors face front end
plate.
(24) Install two reflectors (19) on front end plate (6)
with six screws (20). Torque to 84-108 lb-in.
(9.5-12.2 Nm).
WARNING
Do not place fingers between rotors.
Turning rotors may cause serious
Injury.
(25) Position blower (10) bottom down with rear end
plate (1) facing you.
NOTE
Timing mark (located at flat spot) in
end of each rotor shaft will aid in
aligning rotors and gears.
(26) Set rotors (8 and 9) so that flat spots on splines
are in line with each other and facing left.
NOTE
Folded shop towel should be placed
between rotor lobes to keep rotors
from turning.
(27) Install two spacers (21) on two rotors (8 and 9).
(28) Coat splines of rotors (8 and 9) with lubricating
oil.
(29) Install both timing gears (22 and 23) on rotors (8
and 9) at the same time so that flat spots in gear
splines align with flat spots in rotor splines.
(30) Coat screws (24 and 25) with lubricating oil.
(31) Install two spacers (26) and screws (24 and 25)
in timing gears (22 and 23).
NOTE
Screws must be tightened evenly to
draw both timing gears tight.
(32) Tighten screws (24 and 25) to 110 lb-ft (149
Nm).
20-11
|
|
Privacy Statement - Press Release - Copyright Information. - Contact Us |
