|
| |
TM 9-2320-360-34-1
12-3. PLANETARY AND HUB REPAIR
This task covers
a. Removal
d. Assembly
b. Disassembly
e. Installation
c. Cleaning/Inspection
f. Follow-On Maintenance
INITIAL SETUP
Equipment Conditions
Tools and Special Tools (Cont)
Brake drum removed (TM 9-2320-360-20).
Wrench Set, Socket, 3/4 In. Drive (Item 231,
Driveline control in locked position
Appendix E)
(TM 9-2320-360-10).
Wrench, Torque, 0-600 Lb-Ft (Item 233,
Transfer case in low range
Appendix E)
(TM 9-2320-360-10).
Wrench, Torque, 0-175 Lb-Ft (Item 236,
Appendix E)
Tools and Special Tools
Tool Kit, Genl Mech (Item 202, Appendix E)
Materials/Parts
Adapter, Socket Wrench, 3/4 In. Female -
Adhesive-Sealant, Silicone (Item 2, Appendix B)
1 In. Male (Item 6, Appendix E)
Adhesive-Sealant (Item 4, Appendix B)
Compressor Unit, Air (Item 24, Appendix E)
Cloth, Crocus (Item 16, Appendix B)
Goggles, Industrial (Item 57, Appendix E)
Oil, Lubricating (Item 44, Appendix B)
Guide Sleeve (Item 62, Appendix E)
Solvent, Dry Cleaning (Item 54, Appendix B)
Remover/Setter, Stud (Item 137, Appendix E)
Nuts, Tristop (8) (Item 152, Appendix F)
Seal Driver, CTI (Item 154, Appendix E)
Packings, Preformed (2) (Item 166, Appendix F)
Seal Driver, CTI (Item 155, Appendix E)
Seal Kit, CTI (item 293, Appendix F)
Socket, Sockethead Screw, 12 mm (Item 174,
Washer, Locking (Item 336, Appendix F)
Appendix E)
Socket, Spanner (Item 179, Appendix E)
Personnel Required
Two
a.
Removal
NOTE
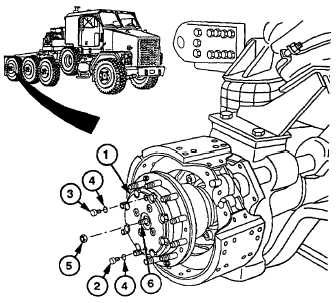
All planetaries and hubs are repaired
the same way. No. 4 axle right side is
shown.
(1)
Place drain pan under planetary assembly
(1).
(2)
Position hub so that drain plug (2) is
down.
(3)
Remove lower plug (2) from planetary
assembly (1).
(4)
Remove upper plug (3) from planetary
assembly (1).
(5)
Remove two preformed packings (4) from
plugs (2 and 3). Discard preformed
packings.
(6)
Remove nut (5) from plug (6) in planetary
assembly (1).
12-4 Change 1
|