|
| |
TM 9-2320-360-34-1
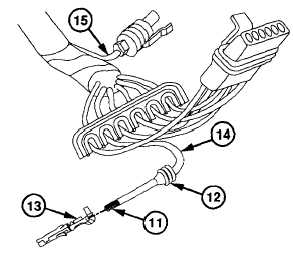
(6)
Insert 1 in. (2.5 cm) of wire (11) through
new wire seal (12).
CAUTION
Strip wire after placing it through seal
to prevent damage to individual cable
strands.
(7)
Strip end of wire (11) leaving 0.25 in.
(0.64
cm)
of
bare
wire
using
wire
strippers.
(8)
Insert new terminal (13) in locating hole of
crimp tool using proper hole according to
gage of wire (11).
(9)
Slide seal (12) down to end of insulation
(14) on wire (11).
NOTE
Wire and seal should be positioned
so larger wings of terminal will crimp
around seal and smaller wings will
crimp around exposed bare wire.
(10)
Position wire (11) on terminal (13).
(11)
Press handles of crimp tool together until
ratchet releases and crimp is complete.
(12)
Repeat steps (6) thru (11) for remaining
five wires (11) and horn button wire (15).
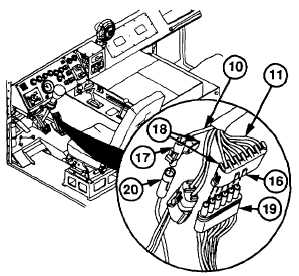
NOTE
See table 6-1 for proper positioning
of wires in connector. Letters are
located on connector.
(13)
Push six wires (11) in connector (16) until
seated.
(14)
Push horn button wire (10) in connector
(17) until seated.
(15)
Latch
secondary
locks
(18)
on
two
connectors (16 and 17).
(16)
Install 6-pin electrical connector (19) in
electrical connector (16).
(17)
Install horn button electrical connector
(20) on electrical connector (17).
6-45
|