|
| |
TM 9-2320-360-34-1
6-2. 12-VOLT ALTERNATOR REPAIR (CONT)
(4)
Inspect electrical assemblies for damage, frayed or bare wires, or loose connections.
(5)
Inspect mechanical assemblies for damage. Check for old or excess grease.
(6)
Clean rectifier assembly holes and terminal screws to ensure good electrical contact.
(7)
Clean carbon coating off slip rings with crocus cloth
(8)
Inspect brushes for burnt appearance, cracks, broken edges.
(9)
Check brush wear and replace if length measures less than 3/16 in. (4.76 mm).
(10)
Check drive end housing bearing for smooth rotation. If bearing binds, replace bearing.
(11)
Check slip ring housing bearing for missing rollers. If rollers are missing, replace bearing.
d.
Assembly
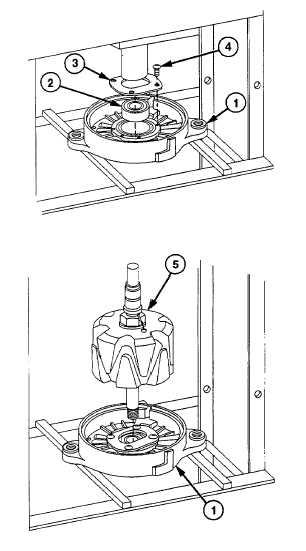
(1)
Position drive end housing (1) in press.
CAUTION
Apply pressure only on outer portion
of race when pressing bearing into
drive end housing. Failure to comply
may result in equipment damage.
(2)
Press bearing (2) in drive end housing (1).
(3)
Install bearing retainer (3) in drive end
housing (1) with four screws (4).
NOTE
Threaded end of shaft must point
downward.
(4)
Install rotor assembly (5) in drive end
housing (1).
(5)
Remove rotor assembly (5) from press.
6-10
|