|
| |
TM 9-2320-360-34-1
6-2. 12-VOLT ALTERNATOR REPAIR
This task covers
a. Disassembly
d. Assembly
b. Cleaning/Inspection
e. Follow-On Maintenance
c. Testing
INITIAL SETUP
Equipment Conditions
Materials/Parts
Alternator removed (TM 9-2320-360-20).
Cloth, Crocus (Item 16, Appendix B)
Compound, Insulating (Item 20, Appendix B)
Tools and Special Tools
Grease, Automotive and Artillery (Item 32,
Tool Kit, Automotive Fuel and Electrical
Appendix B)
System Repair (item 199, Appendix E)
Solvent, Dry Cleaning (Item 54, Appendix B)
Caliper Set, Micrometer (Item 15, Appendix E)
Tags, Identification (Item 56, Appendix B)
Caps, Vise Jaw (Item 17, Appendix E)
Gasket (Item 60, Appendix F)
Compressor Unit, Air (Item 24, Appendix E)
Gasket (Item 69, Appendix F)
Goggles, Industrial (Item 57, Appendix E)
Locknuts (3) (Item 98, Appendix F)
Press, Hydraulic (Item 116, Appendix E)
Locknut (Item 100, Appendix F)
Puller Kit, Mechanical, Gear and Brg
Lockwashers (3) (Item 137, Appendix F)
(Item 124, Appendix E)
Lockwashers (2) (item 118, Appendix F)
Vise, Machinist's (Item 207, Appendix E)
Lockwashers (2) (Item 119, Appendix F)
Wrench, Torque, 0-175 Lb-Ft (Item 236,
Lockwashers (2) (Item 142, Appendix F)
Appendix E)
Personnel Required
MOS 63G
a.
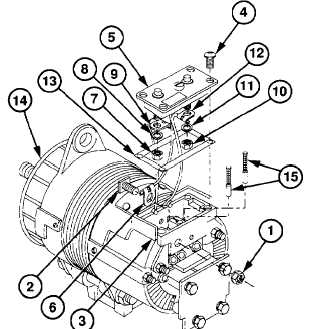
Disassembly
(1)
Remove tenz nut (1) from ignition (IGN)
stud (2) on regulator holder (3).
CAUTION
Voltage regulator is still connected
by two wires. Regulator cannot be
removed until after step (5). Failure
to comply may result in damage to
alternator.
(2)
Remove four screws (4) and voltage
regulator (5) from regulator holder (3).
(3)
Remove ignition (IGN) stud (2) and wire
(6) from regulator holder (3).
(4)
Remove nut (7), lockwasher (8), and black
wire (9) from negative (-) terminal of
voltage regulator (5). Discard lockwasher.
(5)
Remove nut (10), lockwasher (11), and
red wire (12) from positive (+) terminal of
voltage regulator (5). Discard lockwasher.
(6)
Remove voltage regulator (5) and gasket
(13) from alternator (14). Discard gasket.
(7)
Remove two brushes (15) from regulator
holder (3).
6-2
|