|
| |
TM 9-2320-360-34-1
5-6. FAN CLUTCH REPAIR (CONT)
WARNING
Wear eye protection and use care
when
installing
retaining
rings.
Retaining rings are under spring
tension and can act as projectiles
when released and could cause
severe eye injury.
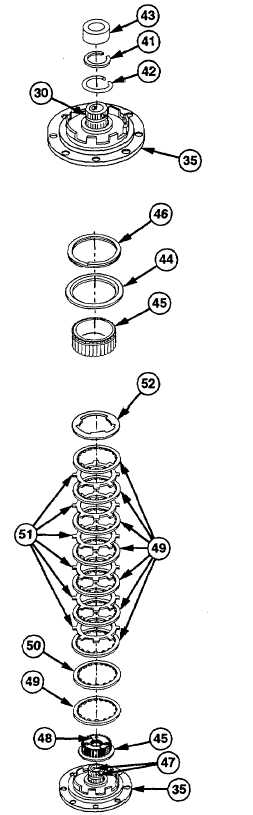
(50)
Install new retaining ring (41) and spacer
(42) on fan hub (30).
CAUTION
Ensure blocking is installed under
bearing retainer and not under inner
fan hub before pressing fan hub or
damage to fan hub may result.
(51)
Support bearing retainer (35).
(52)
Use tool no. 3 (43) to tap fan hub (30)
down approximately 1/16 in. (1.5 mm) to
seat bearing against spacer (42) and
retaining ring (41).
(53)
Install back plate (44), flat side down, on
splined hub (45).
CAUTION
Ensure retaining ring fits completely
in groove of splined hub and groove
of back plate or retaining ring,
splined hub, and back of plate may
be damaged.
(54)
Install new retaining ring (46) on splined
hub (45).
CAUTION
Oil holes in fan hub must align with
oil notches in splined hub or clutch
may be damaged.
(55)
Align oil holes (47) with notches (48) and
install splined hub (45) on bearing retainer
(35).
(56)
Install one fiber splined plate (49) and one
metal splined plate (50) on splined hub
(45).
(57)
Install alternating seven fiber splined
plates (49) and six clutch plates (51) on
splined hub (45).
(58)
Install pressure plate (52), with tabs up, on
splined hub (45).
5-34
|