|
| |
TM 9-2320-360-34-1
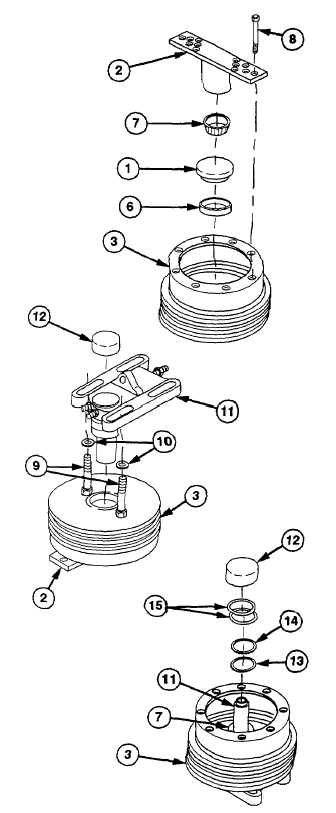
5-6. FAN CLUTCH REPAIR (CONT)
(5)
Support fan pulley (3) with suitable
blocking.
(6)
Coat bearing race 6) with lubricating o6.
(7)
Use tool no. 2 (1) to press bearing race
(6), thin edge up, into fan pulley (3) until
tool contacts fan pulley.
(8)
Coat bearing (7) with lubricating oil.
(9)
Install bearing (7), numbered side up, in
bearing race (6).
(10)
Attach tool no. 5 (2) to fan pulley (3) using
5/16-6 x 2 in. (51 mm) screws (8) from
fan drive overhaul tool kit. Finger tighten
screws.
(11)
Support fan pulley (3) and tool no. 5 (2)
with wooden blocks.
(12)
Place two screws (9) and washers (10),
threads up, on fan pulley (3).
(13)
Coat bracket and shaft assembly (11) with
lubricating oil.
(14)
Use tool no. 8 (12) to press bracket and
shaft assembly (11) into fan pulley (3)
over two screws (9).
(15)
Remove tool no. 5 (2) from fan pulley (3).
(16)
Install new spacer (13) and new retaining
ring (14) on bracket and shaft assembly
(11).
CAUTION
Ensure blocks are placed under
pulley, not under bracket and shaft
assembly. Failure to comply may
result in damage to bracket and shaft
assembly.
(17)
Support fan pulley (3) with wooden blocks.
(18)
Use tool no. 8 (12) to tap bracket and
shaft assembly (11) down approximately
1/16 in. (1.5 mm) to seat spacer (13) and
retaining ring (14) on bearing (7).
(19)
Coat two new preformed packings (15)
with lubricating oil and install on bracket
and shaft assembly (11).
5-30
|