 |
|||
|
|
|||
|
Page Title:
Check Engine Lamp Circuit - Test |
|
||
| ||||||||||
|
|
 TM 9-2320-312-24-2
Troubleshooting Section
Result 2 The change oil lamp did not turn
D. The test lamp should turn on. If the test lamp
does not turn on, either the test lamp is faulty or
on. The vehicle's lamp circuit is not functioning
the wiring to the ECM is faulty. Continue with this
properly. The lamp is probably burned out or
step if the lamp turns on.
there is a problem in the wiring from the cab to
either the ECM or the +battery connection. Repair
E. Leave the probe of the test lamp connected to
the lamp circuit or send the vehicle to the OEM
terminal 52 (unswitched +battery).
dealer for repairs. STOP.
Result 3
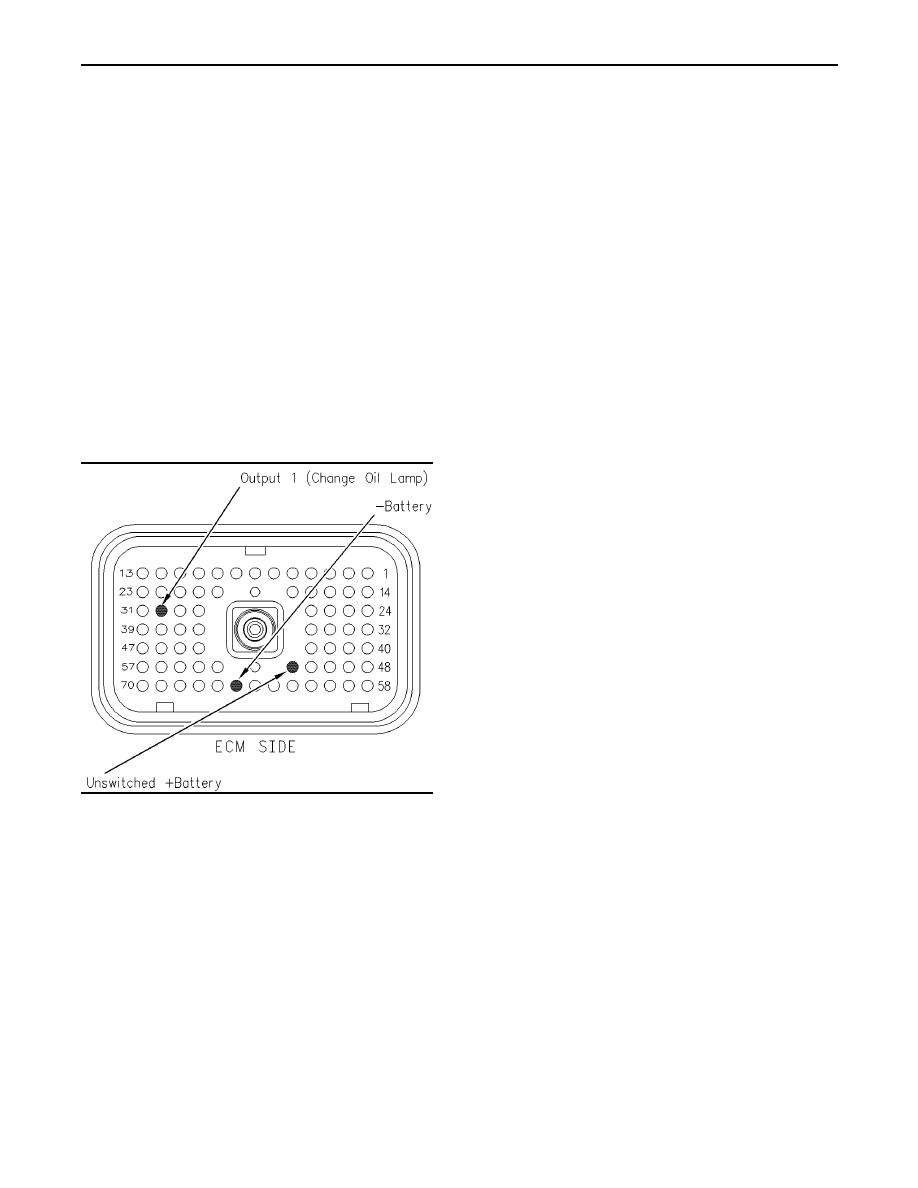
F. Connect the other probe of the test lamp to
terminal 30 (Output 1) of the breakout T.
Repair: Perform the following diagnostic
Refer to Illustration 44.
procedure:
G. Connect ET. Access the following display
The circuit between the ECM and the lamp is
screens in order:
shorted to chassis ground. Repair the circuit or
send the vehicle to the OEM dealer for repairs.
Diagnostics
STOP.
Diagnostic Test
Test Step 4. Check the Output Circuit of
the ECM.
Special Test
H. Activate the "Change Oil Lamp" test. Observe
the voltage test lamp. The lamp should turn on
when the test is active. Also, the lamp should
turn off when the test is inactive.
Expected Result:
The test lamp turns on and the test lamp turns off
per the above description.
Results:
Yes The ECM is operating correctly. There is a
problem in the vehicle wiring or the lamp. STOP.
No
Repair: Temporarily connect a test ECM. Check
the output circuit of the ECM that supplies power
to the change oil lamp when the test ECM is
installed. If the problem is resolved with the test
g00836186
Illustration 44
ECM, reconnect the suspect ECM. If the problem
Breakout T
returns with the suspect ECM, replace the ECM.
A. Disconnect ECM vehicle harness connector
STOP.
J1/P1.
B. Insert a 70-Terminal breakout T between ECM
i01631786
vehicle harness connector J1 and ECM vehicle
Check Engine Lamp Circuit -
harness connector P1.
Test
C. Connect one probe of the voltage test lamp to
terminal 65 (-battery). Connect the other probe of
SMCS Code: 7431-081
the voltage test lamp to terminal 52 (unswitched
+battery) of the breakout T.
System Operation Description:
Use this procedure under the following situation:
|
|
Privacy Statement - Press Release - Copyright Information. - Contact Us |