 |
|||
|
|
|||
|
|
|||
| ||||||||||
|
|
 TM 9-2320-312-24-2
Specifications Section
Tighten each of the cap bolts to the following
Note: Handle the fractured connecting rod with
torque. .......................... 54 5 Nm (40 4 lb ft)
care. Use a soft jawed vise in order to hold the
connecting rod while loosening the connecting rod
3. Place an index mark on each connecting rod
cap bolts. Use a soft faced hammer in order to tap
cap bolt and tighten each of the cap bolts for an
the connecting rod cap, if necessary.
additional 60 5 degrees (1/6 of a turn).
The connecting rod small end must be heated from
175 to 260 C (347 to 500 F) before the installation
i01569859
of the piston pin bearing.
Piston and Rings
Apply heat only within length (A) of the connecting
rod. ................................. 75 5 mm (3.0 .2 inch)
SMCS Code: 1214; 1215
The bearing joint for the piston pin bearing (B) must
Two-Piece Articulated Piston
be positioned at 12 5 degrees (C) above the
centerline on either side.
(1) Bore size for the piston pin bearing
Bore in the connecting rod for the piston pin
bearing ............................... 43.191 0.013 mm
(1.7004 0.0005 inch)
(2) Bore size for the piston pin after the installation
of the bearing
Bore in the piston pin
bearing ............................... 40.028 0.008 mm
(1.5759 0.0003 inch)
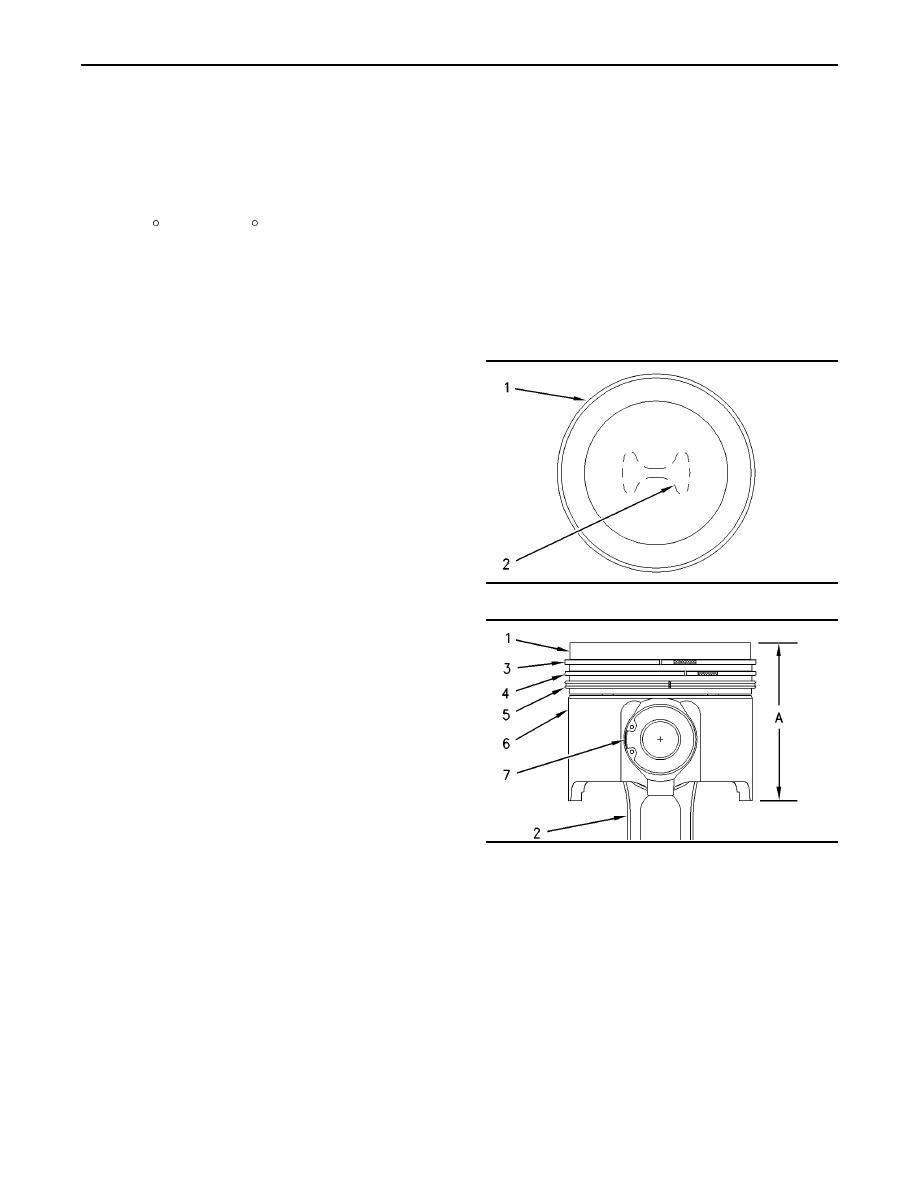
g00293184
(3) Distance between the center of the connecting
Illustration 42
rod bores .............................. 200 mm (7.9 inch)
(4) Crankshaft bore in the connecting rod for
connecting rod journal ....... 75.000 0.013 mm
(2.9527 0.0005 inch)
Note: Use the following procedure to tighten
the connecting rod bolts before measuring the
crankshaft bore. Check the dimensions of the
crankshaft bore only after the tightening procedure
has been followed.
(5) Connecting rod bolts
Use the instructions that follow in order to tighten
g00293185
Illustration 43
the connecting rod cap bolts:
(1) Crown assembly
1. Before installing the rod cap, clean the mating
surfaces of the connecting rod with compressed
(2) Connecting rod
air or a steel brush. Ensure that there are no
loose particles that remain from the process that
Note: Install the rod and piston group in the engine
is used to fracture the rod.
with the part number to the rear of the engine.
The rear of the engine is the flywheel end of the
Note: Lubricate the seating faces of the rod cap
engine. Lubricate the rod and piston group with
bolts with 5P-3931 Anti-Seize Compound or engine
clean engine oil before you insert the rod and piston
oil before installing the bolts.
group into the block.
2. Install new connecting rod cap bolts (5).
|
|
Privacy Statement - Press Release - Copyright Information. - Contact Us |
