 |
|||
|
|
|||
|
|
|||
| ||||||||||
|
|
 TM 9-2320-303-24-2
HOOD SHEET MOLDED COMPOUND (SMC) REPAIR - CONTINUED
0291 00
REPAIR - CONTINUED
t.
Repair damage on outside surface of hood, and paint surface on both sides.
9
11
19
19
20
18
22
21
10
3.
Hood Component Rebonding.
NOTE
If parts cannot be separated, work folded medium-grit sandpaper or section of steel hacksaw blade between
two surfaces to remove old adhesive.
a.
If rebonding joint that has separated or replacing damaged part, completely separate part or parts using heat gun
and putty knife. Remove as much of old adhesive as possible. Heat gun will soften adhesive and allow it to be
peeled off SMC.
b.
Scuff surfaces with 100-220 grit sandpaper.
c.
Clean surfaces are to be bonded with Ashland 6036 primer or methylene chloride. Inspect area closely to be sure
all old adhesive is removed.
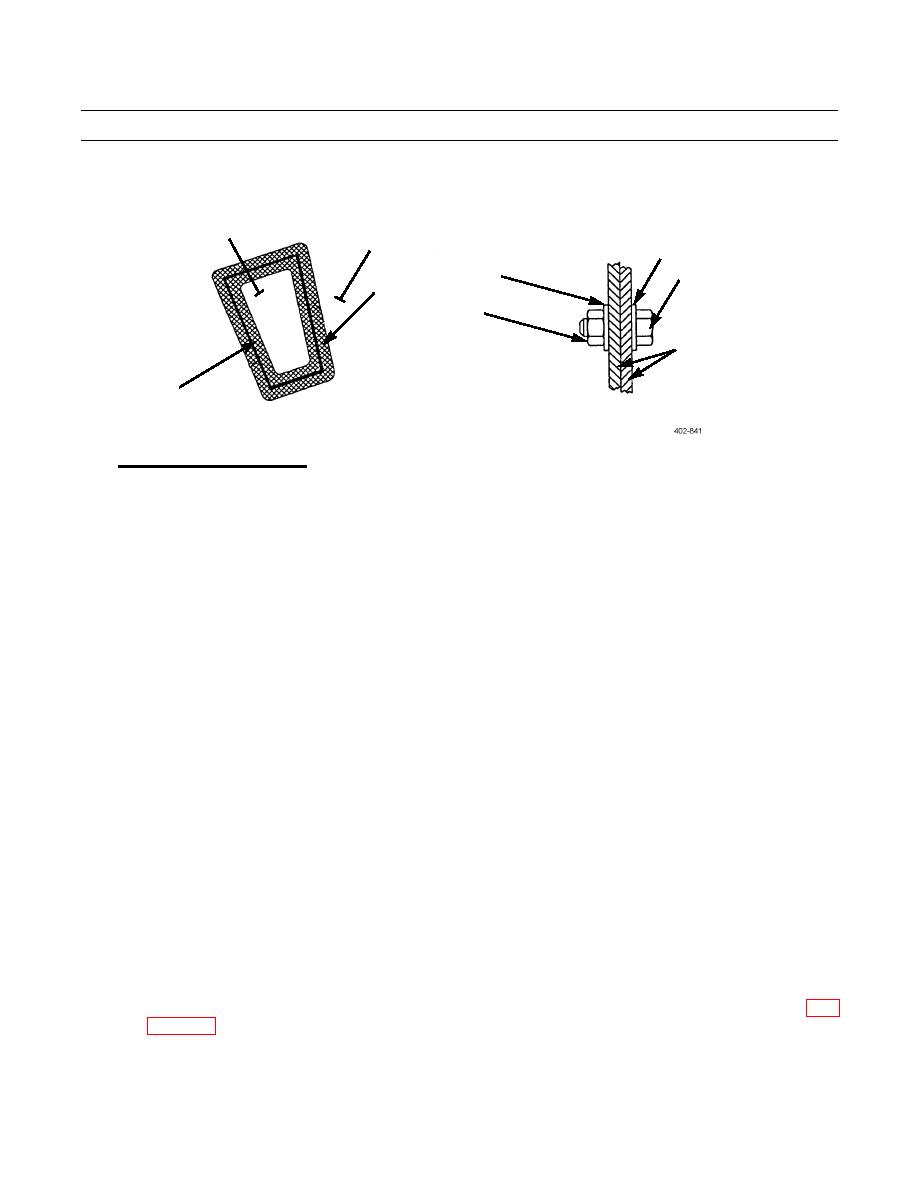
d.
If replacing large part, such as fender, align part on hood and clamp in place. Drill hole through bonding surfaces
(21) and install clamping bolt (20) in hole. Install two washers (19), one on each bonding surface. Install nut (22)
on clamping bolt. There should be enough clamping bolts to hold hood in place and keep bonding surfaces
together, one bolt every 12-18 in (30-45 cm). Remove part for application of adhesive.
e.
Using manufacturer's instructions, mix enough Ashland Pliogrip 6600/6622 adhesive to bond parts together, about
3/8 in (10 mm) diameter bead at bonding surface (21). Adhesive will cure in 7-10 minutes.
f.
Put adhesive in standard caulking gun and cut nozzle so 3/8 in (10 mm) diameter bead can be dispensed. If parts
could not be completely separated, cut nozzle so adhesive can be injected between surfaces.
g.
Dispense 3/8 in (10 mm) diameter bead of adhesive between all bonding surfaces (21).
h.
Within 5 minutes of dispensing adhesive bead, align part on hood and clamp firmly in place. If a large part (fender,
for example), install clamping bolts. Tighten clamps or clamping bolts just enough to ensure uniform amount of
pressure is applied along seam. Ideally, adhesive should be compressed to form bondline 1 in (25 mm) wide and
0.030 in (0.76 mm) thick.
i.
Before adhesive cures, remove excess adhesive that squeezes out edges of bond.
j.
Bond will be secure in about 1 hour. Remove clamps.
k.
If holes were drilled for clamping bolts, repair holes using instructions in Crack or Small Hole Repair on page
END OF WORK PACKAGE
0291 00-7/8 blank
|
|
Privacy Statement - Press Release - Copyright Information. - Contact Us |
