|
| |
TM 5-2420-222-34
14-6.
HYDRAULIC PUMP STROKE CONTROL VALVE REPAIR (Con’t).
11.
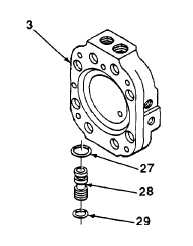
Remove preformed packing (29) and sleeve bushing (28) from
control valve body (3). Discard preformed packing.
12.
Remove preformed packing (27) from control valve body (3).
Discard preformed packing.
b.
CLEANING AND INSPECTION
WARNING
Dry cleaning solvent, P-D-680, Is toxic and flammable. Always wear protective
goggles and gloves, and use only In a well-ventilated area. Avoid contact with
skin, eyes, and clothes, and DO NOT breathe vapors. DO NOT use near open flame
or excessive heat. The solvent's flash point Is 100°F-138F (38C-59C). If you
become dizzy while using cleaning solvent, Immediately get fresh air and medical
help. If solvent contacts eyes, Immediately wash your eyes and get medical aid.
1.
Clean all metal parts with dry cleaning solvent. Dry thoroughly
with clean, dry rags.
2.
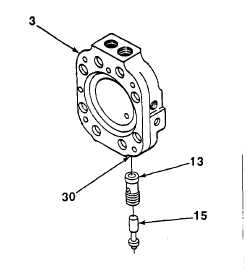
Inspect control valve body (3) for scoring and excessive wear.
Using dial indicator, measure mating surface flatness. Flatness
must be within 0.0030 in. (0.0762 mm).
3.
Using telescoping gage, measure Inside diameter of control
valve body bore (30). Measurement must read 0.7485-
0.7495 in. (19.0119-19.0373 mm).
4.
Using micrometer caliper, measure outside diameter of fluid
restrictor (15). Measurement must read 0.2661-0.2665 in.
(6.7589-6.7691 mm).
5.
Using telescoping gage, measure inside diameter of sleeve
(13). Measurement must read 0.3756-0.3762 in. (9.5402-
9.5555 mm).
6.
Using micrometer caliper, measure outside diameter of sleeve (13). Measurement must read 0.7481-0.7485 in.
(19.0017-19.0119 mm).
TA701 567
14-34
|


