|
| |
TM 5-2420-222-34
7-2.
ENGINE STARTER REPAIR (Con’t).
WARNING
Insulating varnish is toxic and flammable. Boiling point is 230°F (110C). Wear
protective goggles and gloves, and use only in areas with forced ventilation. Avoid
contact with skin, eyes, and clothes, and do not breathe vapors. Do not use near
open flame or excessive heat. If you become dizzy while using insulating varnish,
get fresh air immediately and get medical aid. If contact with eyes is made, wash
your eyes with water and get medical aid immediately. If swallowed, do not induce
vomiting and get medical aid immediately.
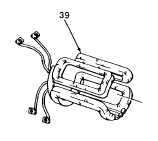
7.
If coil insulation is frayed, worn, or damaged, apply insulating varnish as
required to damaged area using paint brush.
8.
Using soldering gun and tin alloy solder, solder any loose or open circuits on
coil (39).
d.
ASSEMBLY
1.
If removed, install straight pin (48) in main housing (2).
NOTE
• If old sleeve bushing was removed and is being reinstalled in drive housing,
perform steps 2 and 3, then proceed to step 6.
• If new sleeve bushing is being installed, skip step 2.
2.
If old sleeve bushing (49) is being reinstalled, line up oil holes in sleeve bushing and drive housing (1).
3.
Using arbor press and outside diameter remover and installer, press sleeve bushing (49) in drive housing (1).
4.
Using electric drill and twist drill set, drill hole in new sleeve bushing (49) through oil wick hole using same size
twist drill as oil wick hole.
5.
After drilling new sleeve bushing (49), ream hole to 0.499-0.501 in. (12.675-12.725 mm) and remove burrs using
1/8-1/2 in. hand reamer set.
6.
Apply light coat of engine oil to sleeve bushing (49).
7.
Soak wick (50) in engine oil. Position wick in drive housing (1) and install pipe plug (51).
7-22
|