 |
|||
|
|
|||
|
|
|||
| ||||||||||
|
|
 TM 5-2410-233-23
HYDRAULIC PUMP REPAIR - CONTINUED
0149 00
ASSEMBLY - CONTINUED
NOTE
Ensure cartridge assembly is assembled in the same orientation as noted during disassembly.
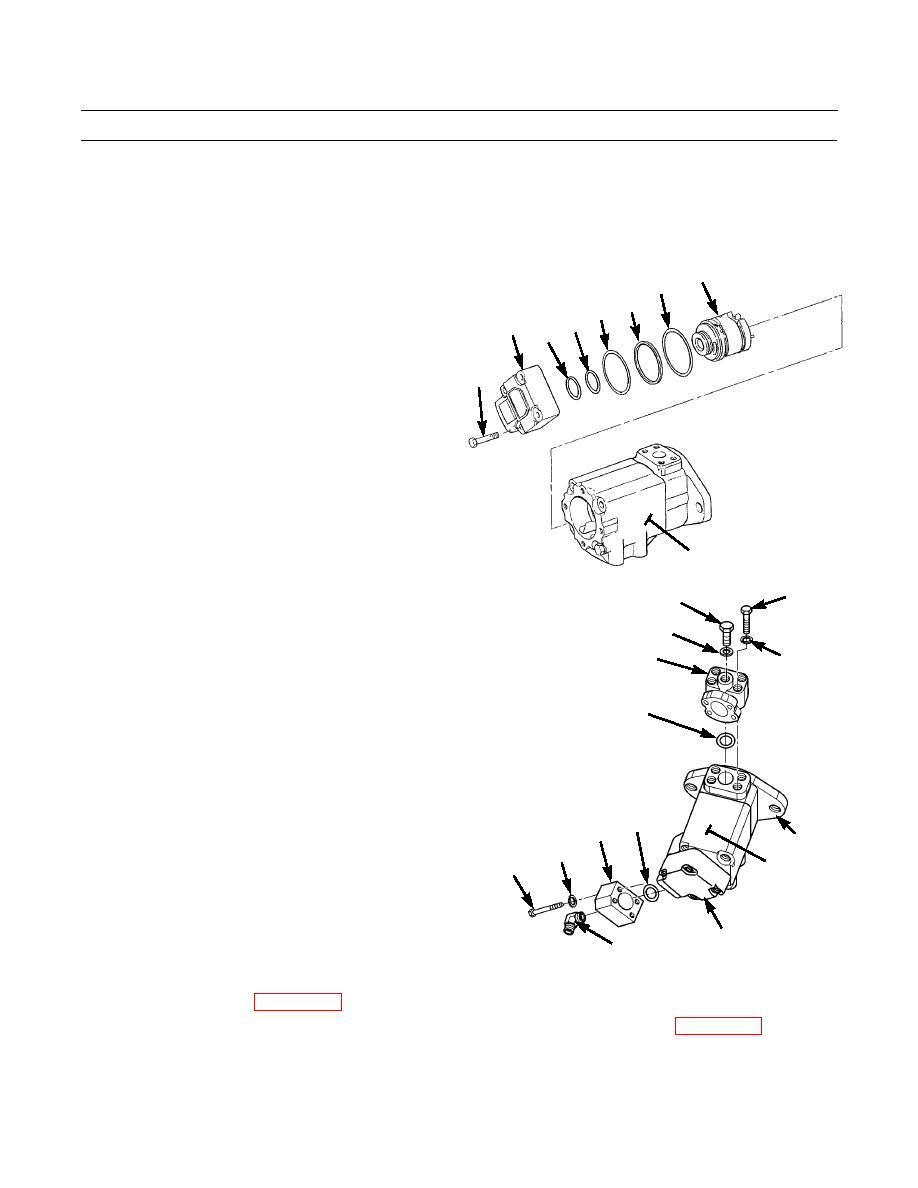
9.
Install new seal (20), new retainer (19), two new seals
21
20
(17 and 18) and washer (16) on front cartridge assem-
18 19
bly (21), with seals installed toward pressure source.
17
1
10.
Install front cartridge assembly (21) on end cover (1),
16
with cartridge positioned so pins in plate are in align-
ment with mounting holes in pump body (2).
15
11.
Install end cover (1) with four capscrews (15). Tighten
capscrews to 45 lb-ft (61 Nm).
2
386-672
NOTE
4
6
After assembly of pump, pump shaft must turn
7
by hand.
8
5
12.
Verify that pump shaft turns by hand. If not, pump
must be disassembled and assembled again.
13.
Install new O-ring (14) and tee (13) on end cover (1)
9
with four new lockwashers (12) and capscrews (11).
14.
Install elbow (10) on tee (13).
15.
Install new O-ring (9) and elbow (8) on top of front
pump housing (3). Secure with four new lockwashers
(5) and bolts (4).
14
16.
Install new O-ring (7) and plug (6) in elbow (8).
13
3
12
11
2
1
386-671
10
17.
Install hydraulic pump (WP 0148 00).
18.
Before returning machine to service, perform pump tests to ensure pump operation is correct (WP 0167 00).
END OF WORK PACKAGE
0149 00-6
|
|
Privacy Statement - Press Release - Copyright Information. - Contact Us |
