 |
|||
|
|
|||
|
|
|||
| ||||||||||
|
|
 TM 9-2320-360-34-2
21-2. WATER PUMP REPAIR
This task covers
a. Disassembly
c.
Assembly
b. Cleaning/Inspection
INITIAL SETUP
Equipment Conditions
Tools and Specials Tools (Cont)
Water pump on clean work surface.
Vise, Machinist's (Item 207, Appendix E)
Wrench, Torque, 0-175 Lb-Ft (Item 236,
Tools and Specials Tools
Tool Kit, Genl Mech (Item 202, Appendix E)
Adapter, Impeller, Slip Test (Item 1,
Materials/Parts
Adhesive-Sealant (Item 7, Appendix B)
Gage, Feeler (Item 50, Appendix E)
Compound, International No. 2 (Item 21,
Goggles, Industrial (Item 57, Appendix E)
Handle, Drive (Item 65, Appendix E)
Compound, Sealing, Pipe Thread (Item 28,
Installer, Oil Seal (Item 80, Appendix E)
Installer, Water Pump Drive Gear (Item 88,
Oil, Lubricating (Item 45, Appendix B)
Solvent, Dry Cleaning (Item 54, Appendix B)
Installer, Water Pump Seal (Item 89,
Tags, Identification (Item 56, Appendix B)
Repair Kit, Water Pump (Item 230, Appendix F)
Pliers, Retaining Ring (Item 108, Appendix E)
Ring, Retaining (Item 244, Appendix F)
Pliers, Retaining Ring (Item 110, Appendix E)
Press, Hydraulic (item 116, Appendix E)
Personnel Required
Puller Kit, Mechanical, Gear and Brg
Two
(Item 124, Appendix E)
a. Disassembly
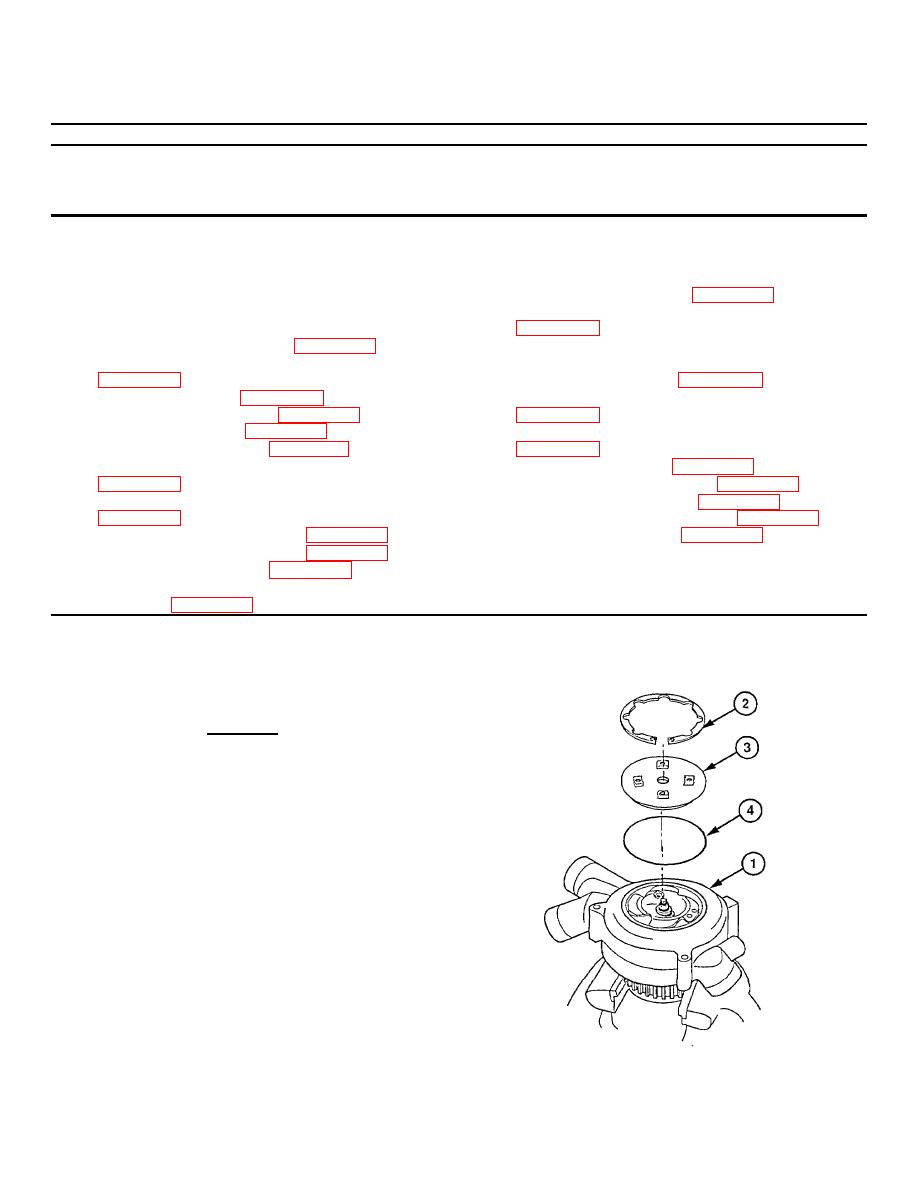
(1) Place water pump (1) gear-side down in
soft-jawed vise.
WARNING
Wear eye protection and use care
when removing retaining rings.
Retaining rings are under spring
tension and can act as projectiles
when released and may cause
severe eye Injury.
Due to size and tension of
retaining ring In step (2), ensure
suitable retaining ring pliers are
used for safety. Press a hammer
against pump cover to help
prevent Injury should retaining
ring slip off pliers.
(2) Remove retaining ring (2), access cover
(3), and seal ring (4) using retaining ring
pliers. Discard retaining ring and seal
ring.
21-2
|
|
Privacy Statement - Press Release - Copyright Information. - Contact Us |