|
| |
TM 9-2320-360-34-1
WARNING
Adhesive-sealant can bum easily, can
give off harmful vapors, and is
harmful to skin and clothing. To
avoid Injury or death, keep away from
open fire and use in well-ventilated
area. If adhesive-sealant gets on skin
or clothing, wash immediately with
soap and water.
(12)
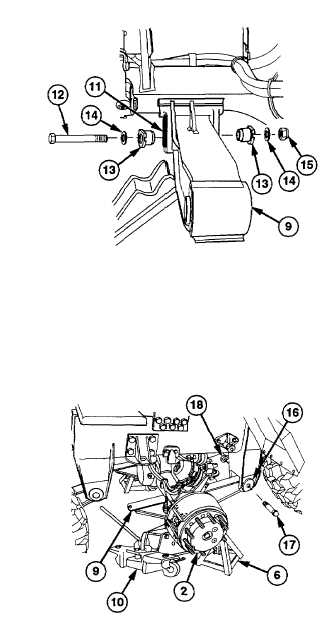
Coat threads of new screw (12) with
adhesive-sealant.
NOTE
Outside collar, washer, and screw are
installed together.
(13)
Install suspension beam (9) in axle
bracket (11) with two new collars (13),
new screw (12), and two new washers
(14).
(14)
Install new locknut (15) on screw (12). Do
not tighten.
NOTE
Axle may need slight adjustment.
(15)
Raise floor jack (10) until suspension
beam (9) is positioned correctly in frame
hanger (16).
(16)
Install suspension beam (9) on frame
hanger (16) with new screw (17) and new
locknut (18). Do not tighten.
(17)
Raise jackstand (6) to support side of axle
(2).
(18)
Remove
floor
jack
(10)
from
below
suspension beam (9).
(19)
Repeat steps (8) thru (18) for other
suspension beam.
10-9
|