|
| |
TM 9-2320-304-14&P
4-234.62
Organizational Maintenance Instructions (Cont)
4-53.11 CONTAINER HANDLING UNIT (CHU) FRONT LIFT ADAPTER LOWER
CONTAINER LOCK PLATE REPAIR (CONT).
b. Cleaning/Inspection.
WARNING
·
Drycleaning Solvent (P-D-680) is TOXIC and flammable. Wear protective goggles,
face shield, and gloves; use only in a well-ventilated area; avoid contact with skin,
eyes, and clothes; and do not breathe vapors. Keep away from heat or flame. Never
smoke when using solvent. The flashpoint for Type III Drycleaning Solvent is 200_F
(93_C). Failure to do so may result in injury or death to personnel.
·
If personnel become dizzy while using cleaning solvent, immediately get fresh air
and medical help. If solvent contacts skin or clothes, flush with cold water. If
solvent contacts eyes, immediately flush eyes with water and get immediate medical
attention.
(1)
Clean all metal parts with drycleaning solvent.
WARNING
Compressed air used for cleaning purposes shall not exceed 30 psi (207 kPa). Use only with
effective chip guarding and personal protective equipment (goggles/shield, gloves, etc.), or
injury to personnel may result.
(2)
Dry parts with compressed air.
(3)
Inspect parts for breaks, cracks, burrs, and sharp edges. Look for unusual signs of wear on lock
plate.
(4)
Replace all damaged parts.
c. Installation.
NOTE
·
There are two lower container lock plates.
Both are installed the same way. Right side
is shown.
·
Install springs as noted prior to removal
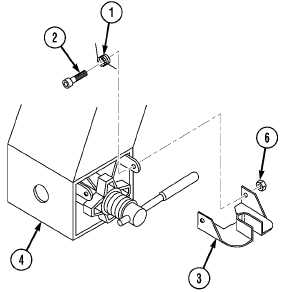
(1)
Position springs (1) on screws (2).
NOTE
It will be necessary to compress springs before
installing screws.
(2)
Install handle lock plate (3) on front lift
adapter (4) with two screws (2) and
springs (1).
WARNING
Adhesives, solvents, and sealing compounds can
burn easily, can give off harmful vapors, and are
harmful to skin and clothing. To avoid injury or
death, keep away from open fire and use in
well-ventilated area. if adhesive, solvent, or
sealing compound gets on skin or clothing, wash
immediately with soap and water.
(3)
Apply sealing compound to threads of two screws (2).
(4)
Install two nuts (6) on screws (2).
Change 1
|

