|
| |
TM 9-2320-304-14&P
4-212.3
Organizational Maintenance Instructions (Cont)
b. Installation.
NOTE
·
Left and right lock limit switches are identical. Right lock limit switch is shown.
·
Install cable ties as required.
(1)
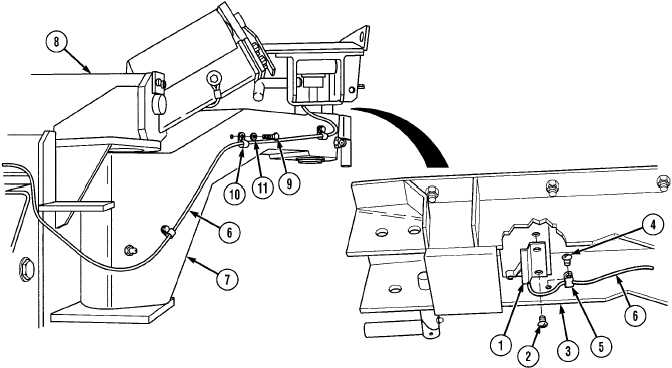
Position lock limit switch (1) with two screws (2) on slider (3). Do not tighten screws.
WARNING
Adhesives, solvents, and sealing compounds can burn easily, can give off harmful vapors,
and are harmful to skin and clothing. To avoid injury or death, keep away from open fire
and use in well-ventilated area. If adhesive, solvent, or sealing compound gets on skin or
clothing, wash immediately with soap and water.
(2)
Apply sealing compound to threads of screw (4).
(3)
Position cushion clip (5) on CHU wire harness (6) and install on slider (3) with screw (4).
(4)
Stow right slider (Para 2-10.6).
(5)
Position CHU wire harness (6) along arm assembly (7) and under rear roller assembly (8).
WARNING
Adhesives, solvents, and sealing compounds can burn easily, can give off harmful vapors,
and are harmful to skin and clothing. To avoid injury or death, keep away from open fire
and use in well-ventilated area. If adhesive, solvent, or sealing compound gets on skin or
clothing, wash immediately with soap and water.
(6)
Apply sealing compound to threads of three screws (9).
CAUTION
Leave enough slack in wire harness around pivot assembly to rotate slider without causing
damage to harness.
(7)
Position three cushion clips (10) on CHU wire harness (6) and install on arm assembly (7) with
three screws (9) and washers (11).
Change 1
|

