 |
|||
|
|
|||
|
|
|||
| ||||||||||
|
|
 TM 5-2410-237-23
WINCH ASSEMBLY REPAIR - CONTINUED
0245 19
ASSEMBLY - CONTINUED
f.
Obtain new shims (117) with a total thickness equal to value determined in step e.
g.
Install pinion assembly in case (5) with four bolts (123) inserted through holes in bearing cage (124). Tighten bolts
to 36 lb-ft (49 Nm).
h.
Install new seal (118) on bearing cage (116).
i.
Install new shims (117) and bearing cage (116) on case (5) with six bolts (115). Tighten bolts to 36 lb-ft (49 Nm).
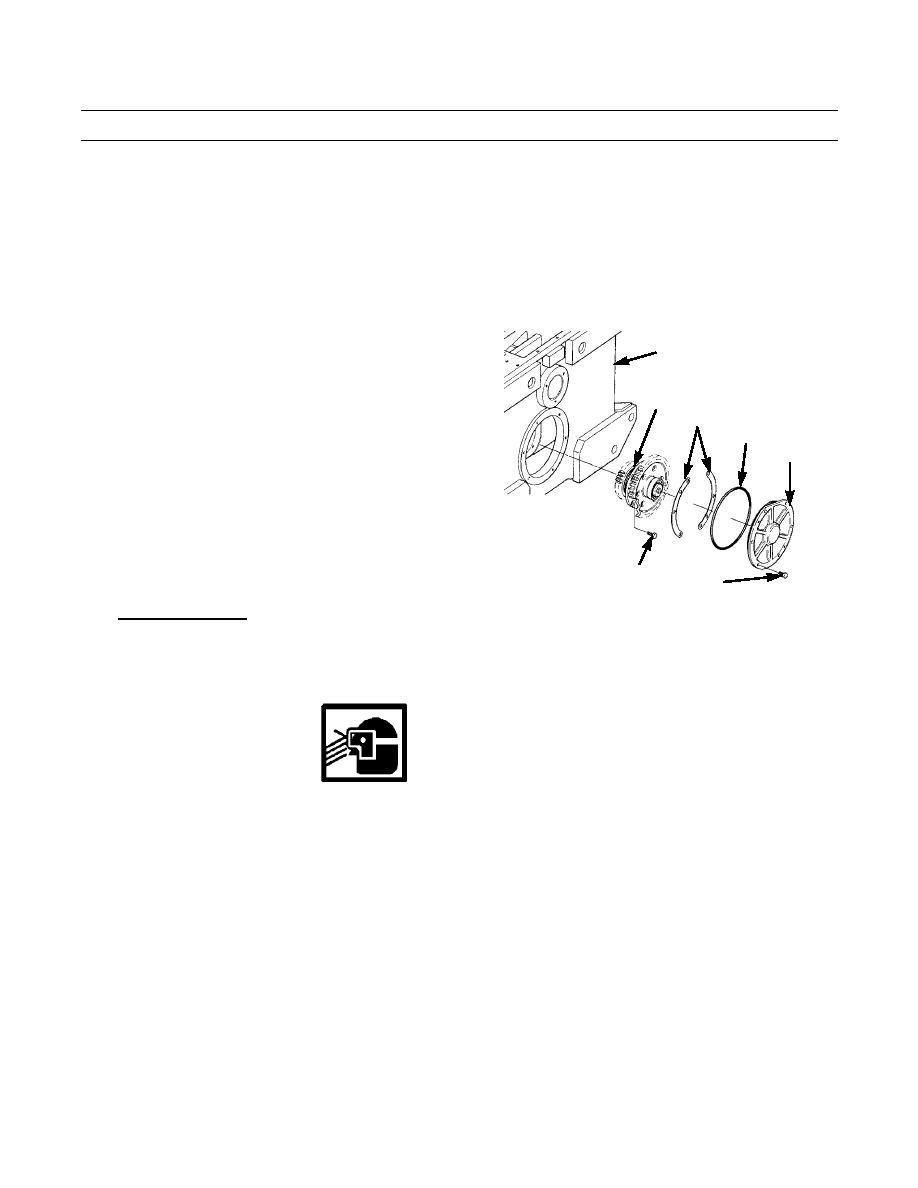
4.
Measure free movement (backlash) of pinion gear (127) between bevel gears (200):
(1)
Install dial indicator with tip of indicator
5
in contact with one tooth of pinion gear.
(2)
Measure backlash at four places.
124
(3)
Backlash must be no smaller than 0.005
117
in. (0.13 mm) and no greater than 0.012
118
in. (0.31 mm).
116
(4)
Add or remove new shims (117) as nec-
essary to obtain correct backlash.
123
115
421-0319
5.
Install Input Clutch.
a.
Install bearing (114) in gear (112) of input clutch.
b.
Install bearing (113) in hub (111).
c.
Install hub (111) on gear (112) with 12 bolts (110). Tighten bolts to 175 lb-ft (237 Nm).
WARNING
Wear eye protection when assembling input clutch assembly. Capscrews on clutch cover plate are under
spring tension. Install each capscrew a little at a time, in rotation. Failure to follow this warning may result
in injury to personnel.
d.
Position pressure plate (109) on clutch hub (108).
CAUTION
Ensure all oil return notches are aligned when installing new clutch discs. Failure to properly align notches
could result in machine failure and damage to equipment.
NOTE
Lightly coat new clutch discs with clean lubricating oil before assembly.
e.
Position new second clutch disc (106), plate (105) and new first clutch disc (104) over clutch hub (108) in pressure
plate (109).
f.
Install new O-ring (107) on clutch hub (108).
g.
Install new gasket (101) on manifold (100). Install new O-ring (103) and new packing retainer (102) on piston
(99).
Change 1
0245 19-30
|
|
Privacy Statement - Press Release - Copyright Information. - Contact Us |
