 |
|||
|
|
|||
|
Page Title:
Testing The Radiator And Cooling System For Leaks |
|
||
| ||||||||||
|
|
 93
TM 9-2320-312-24-2
Testing and Adjusting Section
3. Look at the gauge for the exact pressure that
opens the filler cap.
4. Compare the gauge's reading with the opening
pressure that is listed on the filler cap.
5. If the filler cap is damaged, replace the filler cap.
Testing The Radiator And Cooling
System For Leaks
Table 21
Tools Needed
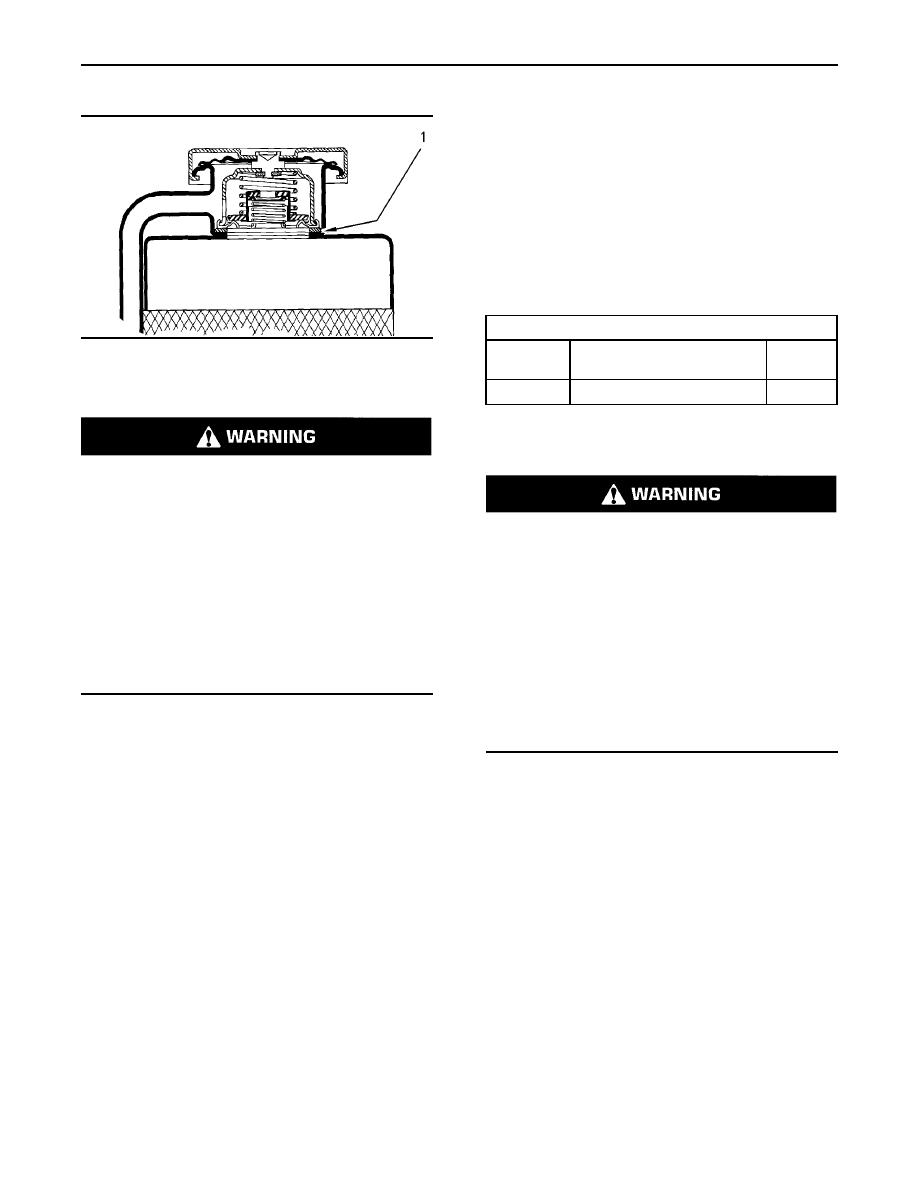
g00296067
Part
Illustration 75
Part Name
Quantity
Number
Typical schematic of filler cap
1
9S-8140
Pressurizing Pump
(1) Sealing surface of both filler cap and radiator
Use the following procedure in order to check the
cooling system for leaks:
Personal injury can result from hot coolant, steam
and alkali.
At operating temperature, engine coolant is hot
Personal injury can result from hot coolant, steam
and under pressure. The radiator and all lines
and alkali.
to heaters or the engine contain hot coolant or
steam. Any contact can cause severe burns.
At operating temperature, engine coolant is hot
and under pressure. The radiator and all lines
Remove filler cap slowly to relieve pressure only
to heaters or the engine contain hot coolant or
when engine is stopped and radiator cap is cool
steam. Any contact can cause severe burns.
enough to touch with your bare hand.
Remove filler cap slowly to relieve pressure only
Cooling System Conditioner contains alkali. Avoid
when engine is stopped and radiator cap is cool
contact with skin and eyes.
enough to touch with your bare hand.
Cooling System Conditioner contains alkali. Avoid
To check for the amount of pressure that opens the
contact with skin and eyes.
filler cap, use the following procedure:
1. After the engine cools, carefully loosen the filler
1. After the engine is cool, loosen the filler cap
cap. Slowly release the pressure from the cooling
slowly and allow pressure out of the cooling
system. Then, remove the filler cap.
system. Then remove the filler cap from the
radiator.
Carefully inspect the filler cap. Look for any
damage to the seals and to the sealing surface.
2. Ensure that the coolant level is above the top of
Inspect the following components for any foreign
the radiator core.
substances:
3. Install the 9S-8140 Pressurizing Pump onto the
Filler cap
radiator.
Seal
4. Take the pressure reading on the gauge to
20 kPa (3 psi) more than the pressure on the
Surface for seal
filler cap.
Remove any deposits that are found on these
5. Check the radiator for leakage on the outside.
items, and remove any material that is found on
these items.
6. Check all connection points for leakage, and
check the hoses for leakage.
2. Install the filler cap on the 9S-8140 Pressurizing
Pump.
The cooling system does not have leakage only if
the following conditions exist:.
|
|
Privacy Statement - Press Release - Copyright Information. - Contact Us |
