|
| |
TM 9-2320-304-14&P
4-149
Organizational Maintenance Instructions (Cont)
g. Fastener Tightening Sequence Procedure.
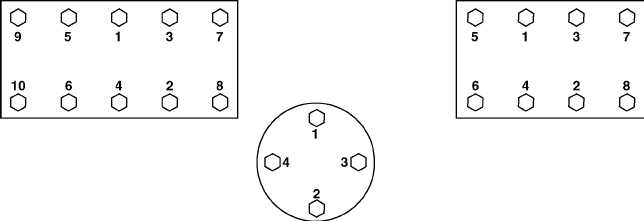
Figure 4-1. General Tightening Sequences.
NOTE
If a component has a critical tightening sequence, it will be illustrated in that particular
task; otherwise, use the general sequence charts provided (Figure 4-1).
(1) Installation Torque.
(a) Tighten nuts twice in a criss-cross pattern using a torque wrench. The first time nut is
torqued, apply approximately 75 percent of the final torque value.
(b) Repeat the sequence a second time until 100 percent of the final torque value has been
obtained for each nut.
NOTE
When one or more screws are loose, check torque for all bolts on the component.
(2) Checking Torque. Tighten nuts in a criss-cross pattern using a torque wrench. Apply 100
percent of the final torque value.
h. Pipe Thread Tightening Procedures.
WARNING
Adhesives, solvents, and sealing compounds can burn easily, can give off harmful vapors,
and are harmful to skin and clothing. To avoid injury or death, keep away from open fire
and use in well-ventilated area. If adhesive, solvent, or sealing compound gets on skin or
clothing, wash immediately with soap and water.
CAUTION
Use sealing compound sparingly and only on male threads. Do not apply compound on first
two threads to avoid contamination of system from compound. Do not apply compound to
hose connections or fittings with preformed packings. Damage to equipment may result.
(1) Coat threads of male fitting with sealing compound, sealant, or adhesive as indicated in each
maintenance task.
(2) Position male fitting on female fitting finger-tight.
(3) Scribe alinement mark on both fittings.
|