 |
|||
|
|
|||
|
|
|||
| ||||||||||
|
|
 TM 9-2320-303-24-1
WINDSHIELD WIPER MOTOR AND LINKAGE REPLACEMENT - CONTINUED
0200 00
REMOVAL - CONTINUED
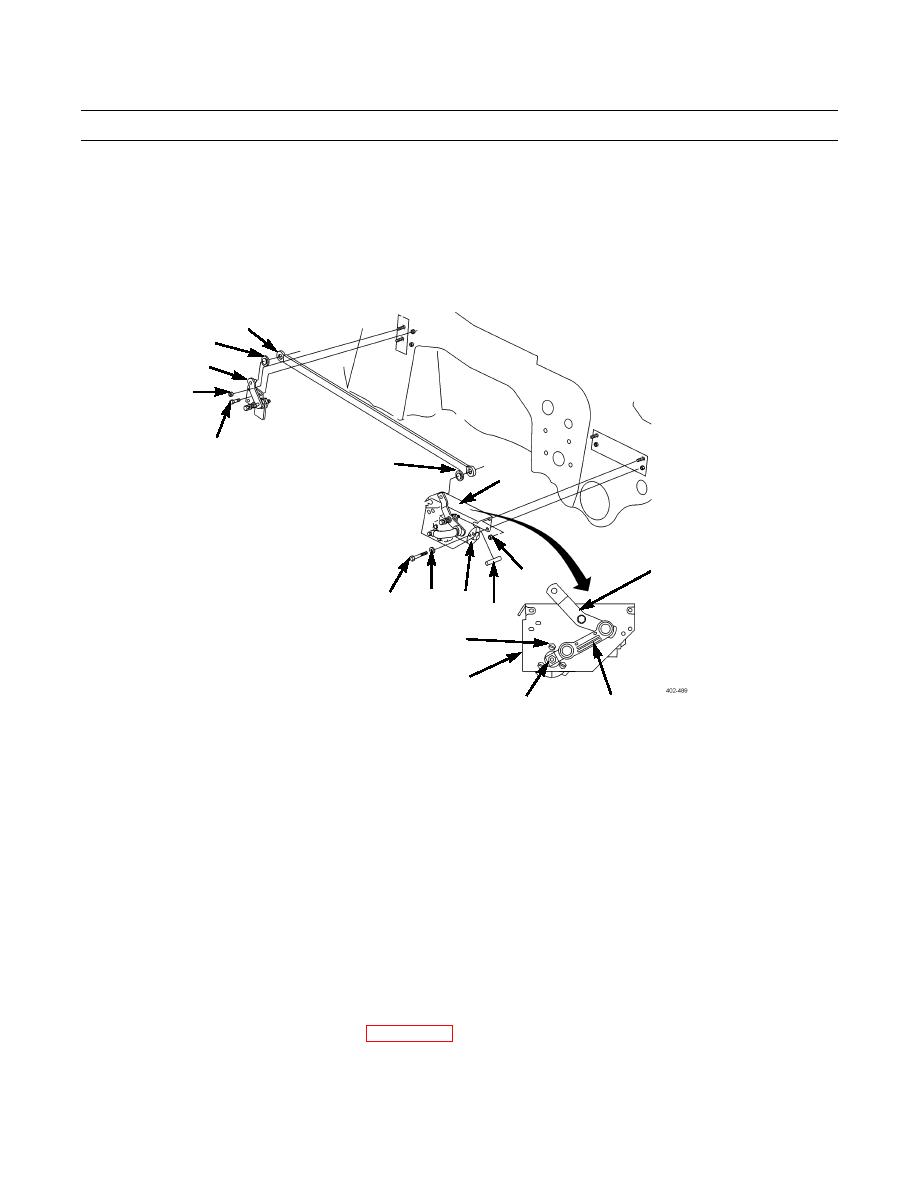
7.
Remove nut (11) and pry wiper motor crank (10) from shaft of wiper motor (6).
8.
Remove three screws (12) and wiper motor (6) from bracket (3).
9.
Remove two nuts (14), two screws (13), and pivot assembly (15) from firewall.
10.
Pry connecting link (1) from pivot assembly (15).
11.
Remove rubber seal (16) from ball joint of pivot assembly (15). Discard rubber seal.
1
16
15
14
13
9
3
2
4
6
7
8
5
12
3
10
11
INSTALLATION
1.
Install new rubber seal (16) to ball joint of pivot assembly (15).
2.
Install connecting link (1) to pivot assembly (15).
3.
Install pivot assembly (15) to firewall with two screws (13) and two nuts (14).
4.
Install wiper motor (6) to bracket (3) with three screws (12). Tighten screws to 55 lb-in (621 Ncm).
5.
Install wiper motor crank (10) to shaft of wiper motor (6) with nut (11).
6.
Position bracket (3) and wiper motor (6) to firewall.
7.
Install two spacers (5), washers (7), and screws (8). Tighten screws to 60-84 lb-in (678-949 Ncm).
8.
Install two new locknuts (4) to bracket (3). Tighten nuts to 60-84 lb-in (678-949 Ncm).
9.
Connect connector of wiper motor (6) to cab wiring harness.
10.
Install new rubber seal (9) to ball joint of linkage pivot bar (2).
11.
Install connecting link (1) to linkage pivot bar (2).
12.
Install windshield wipers and wiper arms (WP 0199 00).
END OF WORK PACKAGE
0200 00-2
|
|
Privacy Statement - Press Release - Copyright Information. - Contact Us |
