 |
|||
|
|
|||
|
Page Title:
AIR HORN VALVE INSTALLATION - CONTINUED |
|
||
| ||||||||||
|
|
 TM 9-2320-302-20-2
AIR HORN AND VALVE REPLACEMENT - CONTINUED
0282 00
AIR HORN VALVE INSTALLATION - CONTINUED
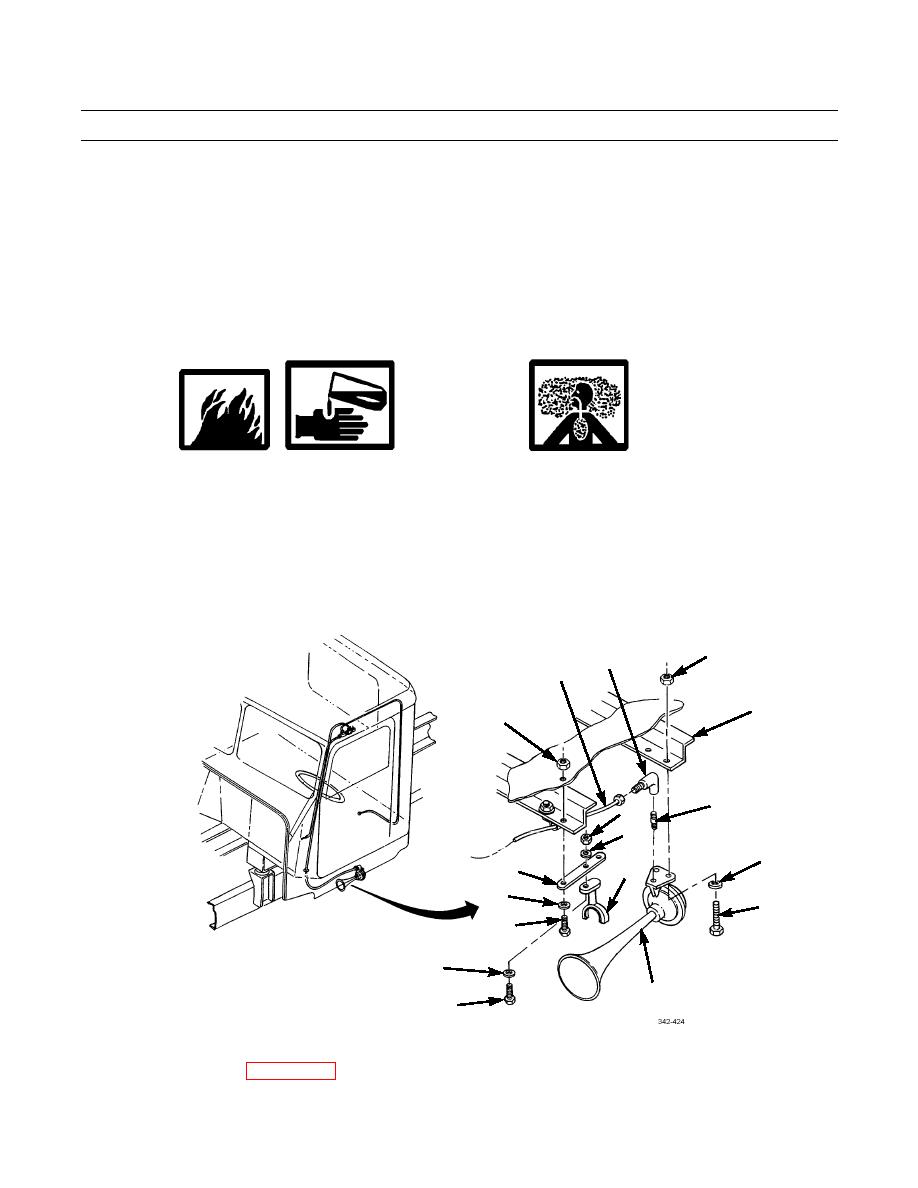
2.
Install tee (25) and elbow (18) on valve (19) and connect three tubes (17) to fittings.
3.
Install valve (19) to cab (20) and secure with two screws (21).
4.
Attach pull cord (22) with clamp loop (23) to valve (19) and secure clamp loop to cab (20) with screw (24).
AIR HORN INSTALLATION
1.
If removed, install plate (15) to cab floor (4) with washer (14), screw (13), and nut (16).
2.
Install bracket (11) to plate (15) with two washers (10), screw (9) and new locknut (12).
WARNINGS
Adhesives and sealing compounds can burn easily, can give off harmful vapors, and are harmful to skin and
clothing. To avoid injury or death, keep away from open fire and use in a well-ventilated area. If adhesives
or sealing compound contacts skin or clothing, wash immediately with soap and water.
3.
Apply pipe sealing compound to nipple (5) and install nipple, elbow (2), and air tube (1) to air horn (8).
4.
Position air horn (8) to bracket (11) and cab floor (4).
5.
Secure air horn (8) in place with two washers (6), two screws (7) and new locknuts (3).
3
2
1
4
16
5
12
10
6
15
11
14
7
13
10
8
9
6.
Start vehicle and check for leaks in air system and operation of air horn (TM 9-2320-302-10).
Install cab head liners (WP 0264 00).
7.
0282 00-3
|
|
Privacy Statement - Press Release - Copyright Information. - Contact Us |
