 |
|||
|
|
|||
|
|
|||
| ||||||||||
|
|
 TM 9-2320-302-20-2
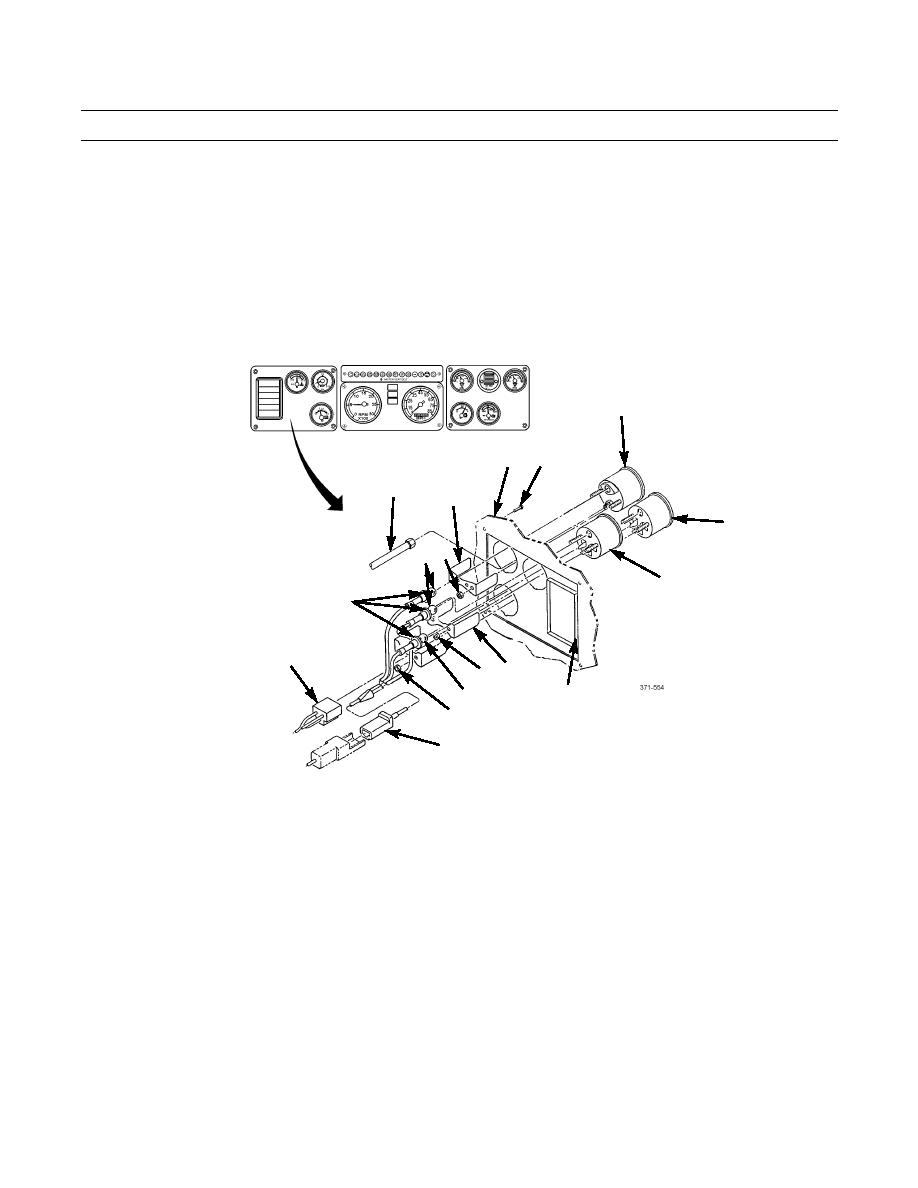
LEFT PANEL GAGES AND LAMPS REPLACEMENT - CONTINUED
0073 00
REMOVAL - CONTINUED
NOTE
Note location of gages to aid in installation.
4.
Remove two locknuts (5), bracket (6), and engine oil pressure gage (9) from panel (7).
5.
Repeat step 4 for engine water temperature gage (10) and voltmeter (11).
6.
Remove air vent (12) from panel (7).
7.
Turn three lamps (4) to left and remove from lamp holders (2).
9
8
7
3
6
10
4 5
11
2
1
6
5
12
4
5
13
INSTALLATION
1.
Install three lamps (4) in lamp holders (2). Turn lamps to right to lock in place.
2.
Install air vent (12) on panel (7).
3.
Install engine oil pressure gage (9) and bracket (6) on panel (7) with two locknuts (5).
4.
Repeat step 3 for engine water temperature gage (10) and voltmeter (11).
5.
Install three lamp holders (2) on engine oil pressure gage (9), engine water temperature gage (10), and voltmeter (11).
6.
Install two tubes (3), connector (13), and two plugs (1) on engine oil pressure gage (9), engine water temperature gage
(10), and voltmeter (11).
7.
Install panel (7) on dashboard with four screws (8).
8.
Run vehicle and build air pressure to proper level (TM 9-2320-302-10). Check operation of gages and check for air sys-
tem leaks.
END OF WORK PACKAGE
0073 00-2
|
|
Privacy Statement - Press Release - Copyright Information. - Contact Us |
