|
| |
TM 5-2420-222-34
5-1.
FUEL INJECTION NOZZLES TEST AND REPAIR (Con’t).
b.
DISASSEMBLY
WARNING
•
No open flames, welding, grinding, smoking, or use of heat
producing devices permitted nearby when using fuel. Fuel burns
easily and fumes are explosive. Keep battery disconnected.
Failure to observe these precautions may cause serious Injury or
death to personnel.
•
Plastic gloves must be worn and kept clean and lubricated
with clean diesel fuel while working on Internal parts of fuel
Injection nozzle. En- sure that work area Is exceptionally
clean. Dirt and lint will cause damage, excessive wear,
leakage, or clogs to fuel Injection nozzles.
CAUTION
Disassemble, clean, Inspect, and assemble fuel Injection nozzles
one at a time to avoid mixing parts. Fuel Injection nozzle parts
are machined to very close tolerances. Mixing parts may cause
leakage, poor performance, or damage to parts.
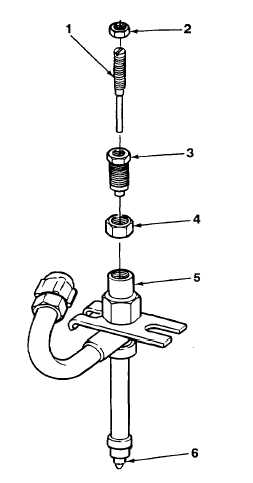
1.
Position fuel Injection nozzle (5) with assembled parts in nozzle
holding fixture and vise.
2.
Loosen adjusting nut (4) partway. Remove locknut (2) from
pressure adjusting screw (3) and lift adjusting screw (1).
3.
Remove pressure adjusting screw (3), lift adjusting screw (1), and
adjusting nut (4) from fuel injection nozzle (5).
4.
Remove fuel injection nozzle (5) with assembled parts from nozzle
holding fixture and vise. Do not tip fuel injection nozzle and spill
internal parts.
CAUTION
Do not bend valve when removing it from fuel injection nozzle. Bending may
damage parts.
5.
Tilt fuel injection nozzle (5) and allow spring (7), spring seat (8), and valve (9) to slide into hand. If valve does not
slide freely from nozzle, use valve retractor to remove valve.
6.
Remove lift adjusting screw (1) and adjusting nut (4) from pressure adjusting screw (3).
7.
Remove dust cap (13) from fuel injection nozzle (5).
TA701318
5-4
|